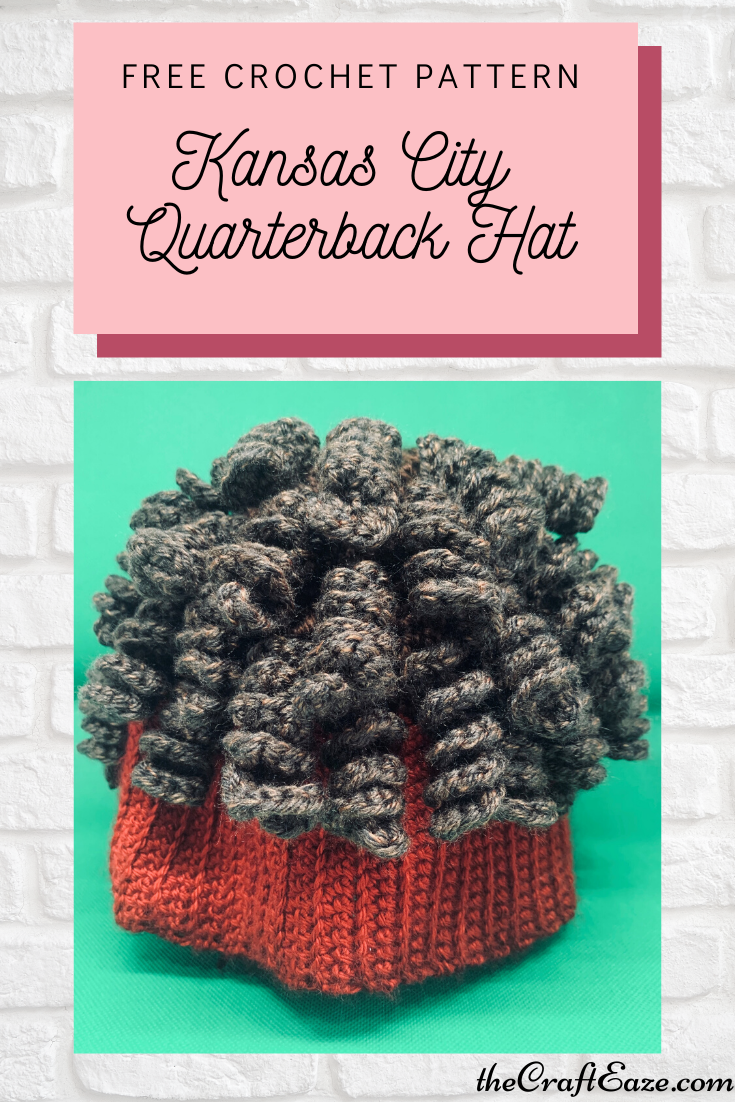
Football is one of my favorite sports. Growing up in Missouri, that meant that there was only one team to root for, the Kansas City Chiefs! Keep in mind, this wasn’t always easy. I remember many rough seasons, but recently the tides have turned.
Disclosure: CraftEaze is a participant in the Amazon Services LLC Associates Program, an affiliate advertising program designed to provide a means for sites to earn advertising fees by advertising and linking to Amazon.com and affiliated sites.
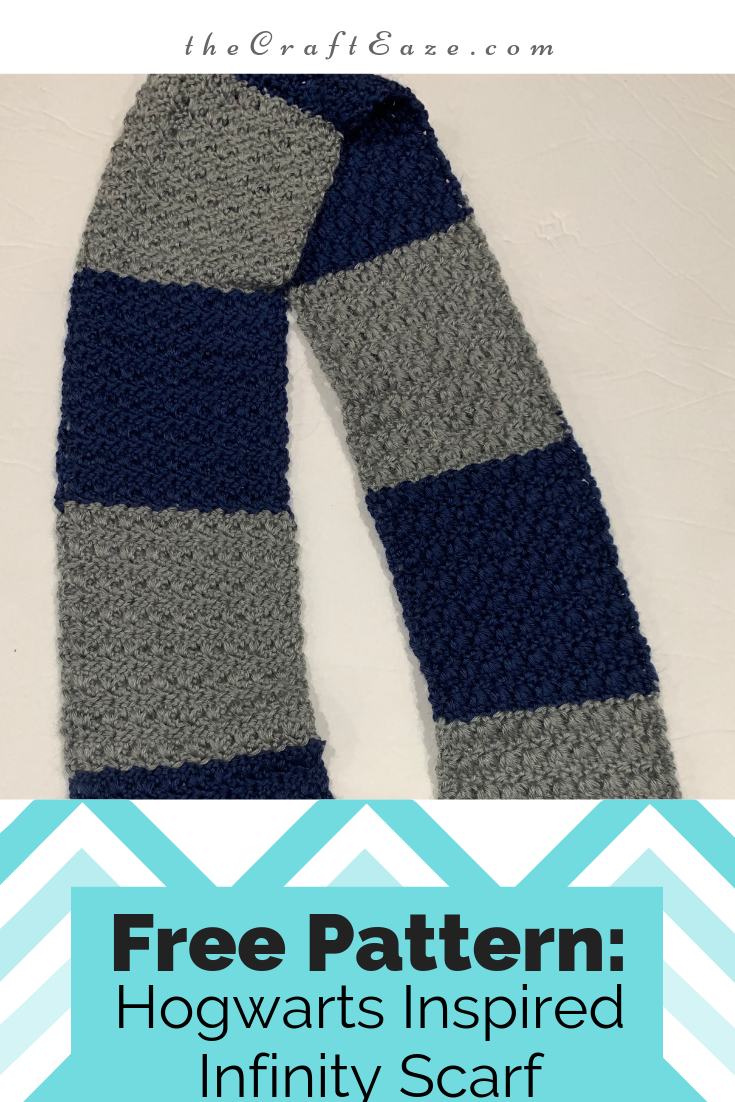
Fall is just around the corner. Fall is one of my favorite seasons, there is football, apple cider, bonfires, and boot and scarf season officially begins! This scarf is perfect for the fall season!
This scarf is inspired by the Hogwarts Houses in Harry Potter. It can be made in a weekend easily for a Halloween costume. This scarf uses a primrose stitch. This video gives a short overview of how to make this stitch. I think it gives this scarf a feminine touch and also makes it a little different from the other Hogwarts inspired scarves so you can wear it all fall and winter long.
You can find a printer-friendly version of this pattern here. We also have kits for sale for this project. You can select your favorite house or take a chance with our magic sorting hat option.
Just as a reminder, here are the Hogwarts house colors.
Row 1: Work [1 sc, 2 ch, 1sc] in 3rd chain from hook. *skip next 2 chains, [1 sc, 2 ch, 1 sc] in next chain. * repeat across ending with 1 hdc in last ch. Turn. (9 sc 2 spaces).
Row 2: Ch 3, *3 dc in the next ch 2 space* . Repeat across ending with 1dc in the top of the turning chain. Turn. (9 shells of 3 dc).
Row 3: Ch 2 (counts as the first hdc). *[1 sc, 2 ch, 1 sc] in the 2nd dc of the next shell (middle dc of the shell)*. Repeat across ending with 1 hdc in top of the turning ch. Turn.
Rows 4-17. Repeat rows 2-3.
Change to the secondary color.
Rows 18-33. Repeat rows 2-3.
Change to the primary color.
Rows 34-49. Repeat rows 2-3.
Change to the secondary color.
Rows 50-65. Repeat rows 2-3.
Change to the primary color.
Rows 66-81. Repeat rows 2-3.
Change to the secondary color.
Rows 82-97. Repeat rows 2-3.
Change to the primary color.
Rows 98-113. Repeat rows 2-3.
Change to the secondary color.
Rows 114-129. Repeat rows 2-3.
Change to the primary color.
Rows 130-145. Repeat rows 2-3.
Change to the secondary color.
Rows 146-161. Repeat rows 2-3.
There should be 5 primary color sections and 5 secondary color sections. You will join the top and bottom to form an infinity scarf using a needle. Fasten off.
Hope you enjoy making your own Hogwarts inspired infinity scarf! What House did you choose?
Disclosure: CraftEaze is a participant in the Amazon Services LLC Associates Program, an affiliate advertising program designed to provide a means for sites to earn advertising fees by advertising and linking to Amazon.com and affiliate sites.
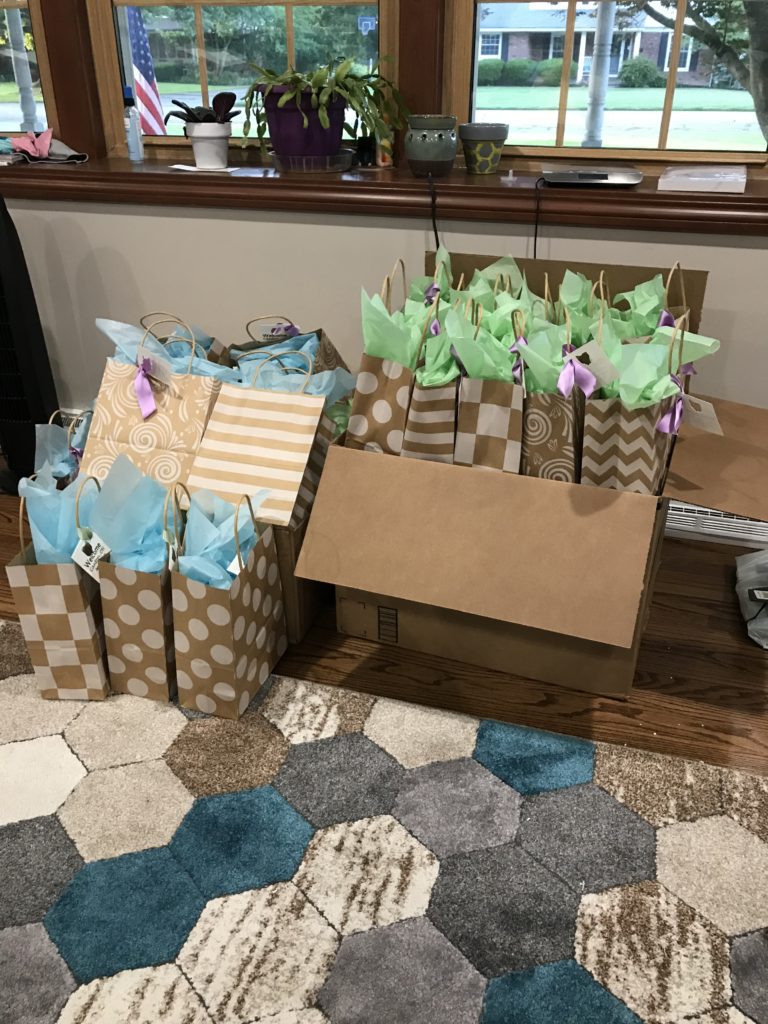
Welcome bags are a nice treat for your out of town wedding guests. Since my husband and I got married in the city we currently live in, almost all of our guest were from out of town. Some of our friends that lived around here also stayed at the hotel that night so they could go out with us after the reception. Welcome bags are appreciated in both cases, especially if you add bottles of water and snacks!
My mom, sister, grandma, and I made the welcome bags during the week prior to the wedding. We even formed somewhat of a convary line to do it (my sister and I are both engineers). They were a lot of fun to put together.
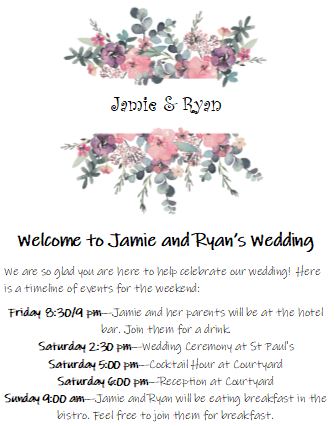
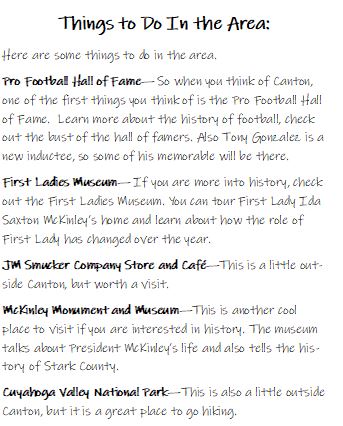
I made a couple of insert for the welcome bag in Microsoft Publisher. Each insert had a different purpose. The first one had a “welcome note” with a timeline of events on the front and a direction/map from the hotel to the church on the back. The second insert was really more for the out of town guests. One side contained a few of our favorite places to eat and drink. The other side contained a list of things to do in the area.
Welcome Insert with ScheduleSome of our favorite places to eat and drinkSome local attractions and things to do.
Bottles of water and food are also great for welcome bags. Avery labels actually make a water bottle label. I used them to make personalized water bottles for welcome bags. They were super easy to use and Avery has many templates that you can use as a starting point. All you have to do is modify the template and it saves it as a PDF. I highly recommend these labels. You can also use them for fundraisers, family reunions, or even events at your child’s school.
Our water bottle label. Avery water bottle labels made it so easy!
We included several food items in the bags. We want to provide both sweet and salty items along with something related to the area. Other items are related to my husband and me. Below is a list of items we included
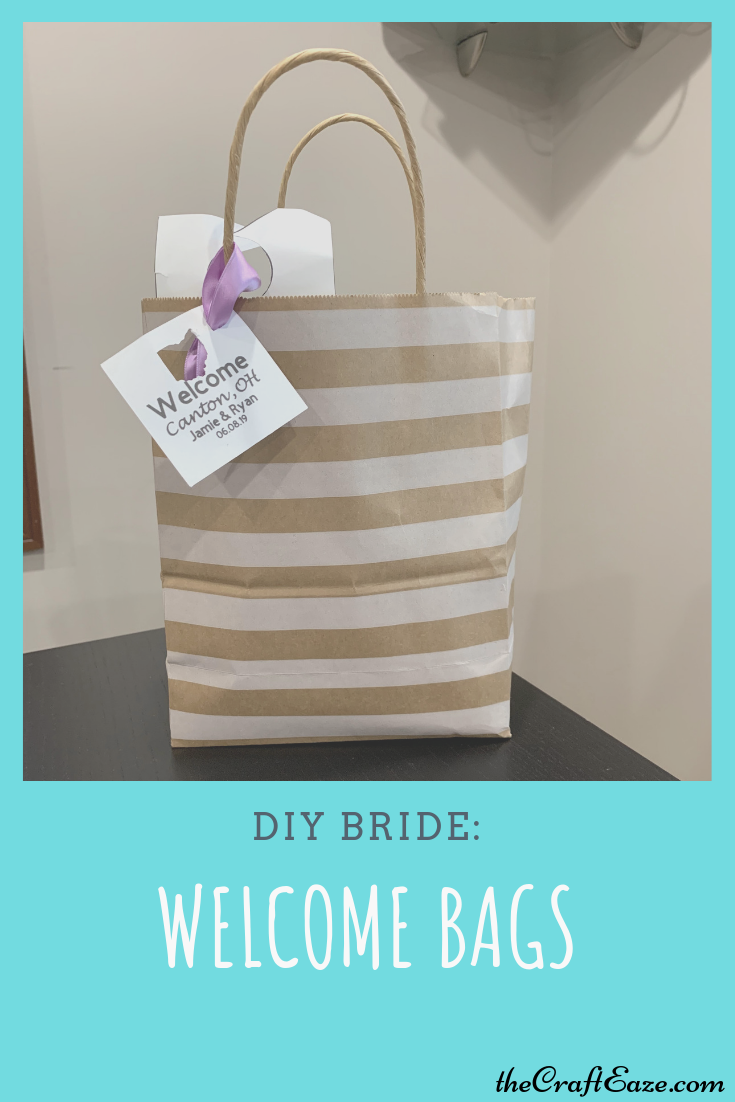
We also included a fun tag on the bag. The tag had a cutout of the state of Ohio in the middle. This tag said, “Welcome – Canton, OH” along with our names and wedding date. My sister was excited because it was another chance to use the Cricut for a wedding project. The final addition to the bag was a custom door hanging. I created this door hanging in Microsoft Publisher. This was one of my favorite wedding projects. I received many compliments about how cool this door hanging was.
Our “Do Not Disturb” door hanging
To complete the bags, we put all of the items in a small brown paper gift bag that had different designs in cream on them. We added the tag to the handle using a piece of purple or mint ribbon. We also fluffed some light purple and blue tissue paper on top to complete the bag. And just like that, the bags were ready to go to the front desk at the hotel.
If you liked this tutorial, be sure to check out some of our other wedding related tutorials.
Disclosure: CraftEaze is a participant in the Amazon Services LLC Associates Program, an affiliate advertising program designed to provide a means for sites to earn advertising fees by advertising and linking to Amazon.com and affiliate sites.
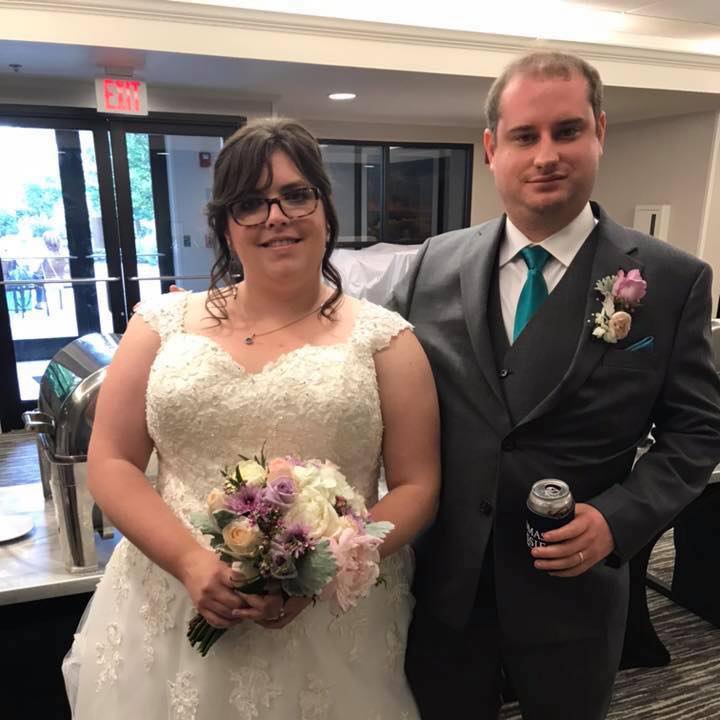
So life has been crazy for the last few months! But I really have a good excuse, I got married! So the few months leading up to the wedding I didn’t really have time to put towards CraftEaze. Also, I was working on some cool projects during this time period, but I didn’t really want to post on Facebook or Instagram so my friends and family would be surprised when they saw everything at the reception.
We are married! Let’s Party! I love my dress, the lace was so pretty.
However, the wedding is over and the thank you notes are in process. So that means I have time for CraftEaze again and also I can share the different projects I worked on for the wedding. We made a lot of decorations for the wedding/reception. My husband even designed a coozie that pretty much described the wedding planning process for us. Today, I am going to write about a project I enjoyed making and am excited to share with you all!
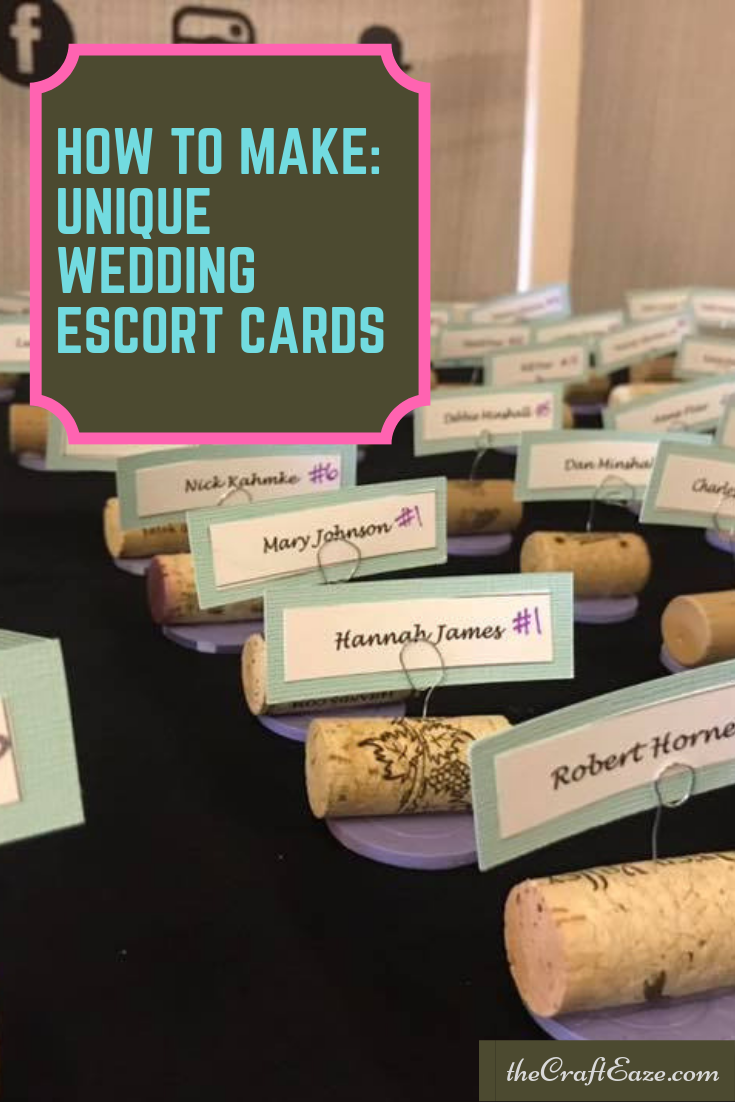
So for my wedding place cards, I knew I wanted to use wine corks. I had been saving corks for almost 2 years for a special project, and this seemed like the perfect project. But I didn’t really want them to look like every other wine cork escort card. After researching how to cut a cork, I became a little overwhelmed by how long it would take to cut all of the corks. So I came up with another way. The following instructions document the process that I came up with.
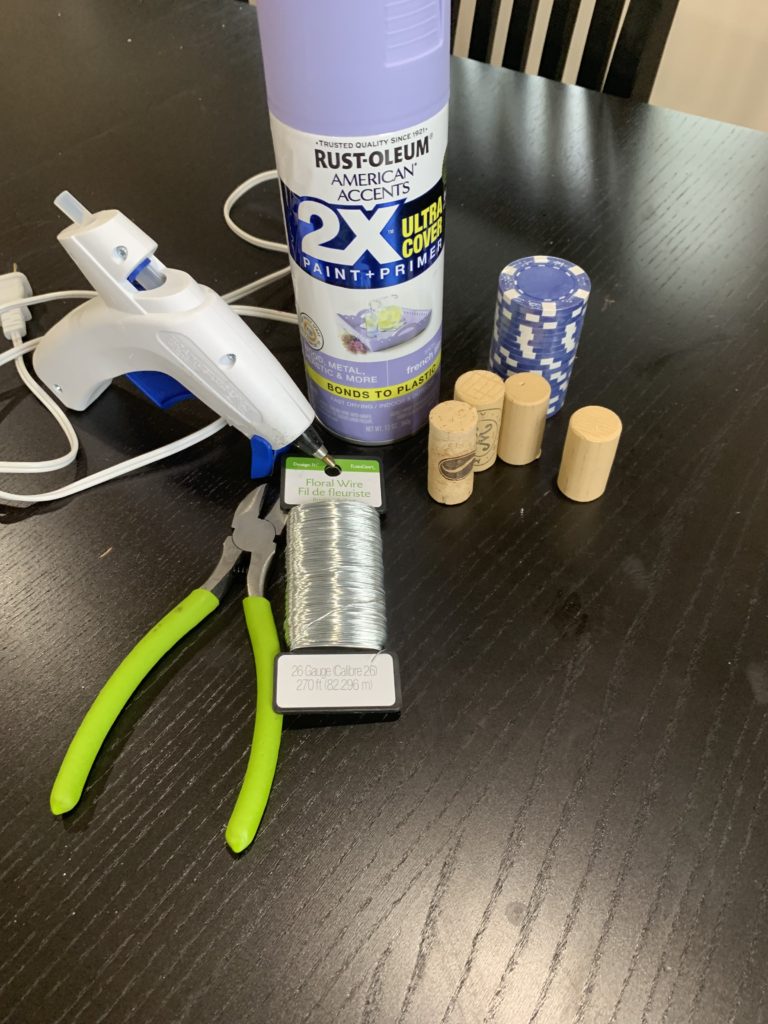
Materials Needed
Materials needed for place cards.
Spray Paint In Accent Color Of Your Choice – I used light purple.
Poker Chips – I like these because they are on the thicker side and as a result a little more stable.
Wine Corks – You can either buy wine corks from Amazon or another craft supplier or you can save them. My husband is convinced the wedding was just an excuse for me to drink wine.
Cream Card Stock – You will want this card stock to be a size that can fit in your printer.
Instructions
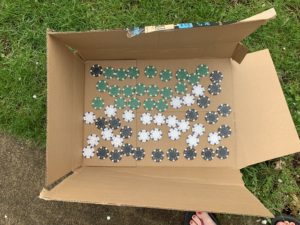
Step 1. Lay out the poker chips.
I used an Amazon box I had laying around to layout the poker chips.
Step 2. Spray paint the poker chips.
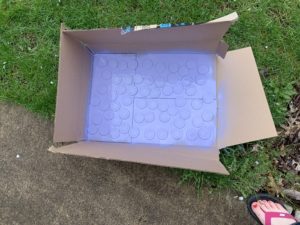
Step 3. Let the poker chips dry. I spray painted my chips in the yard and then left them to dry under my covered front porch for a night.
Painted chips drying on the cardboard box.
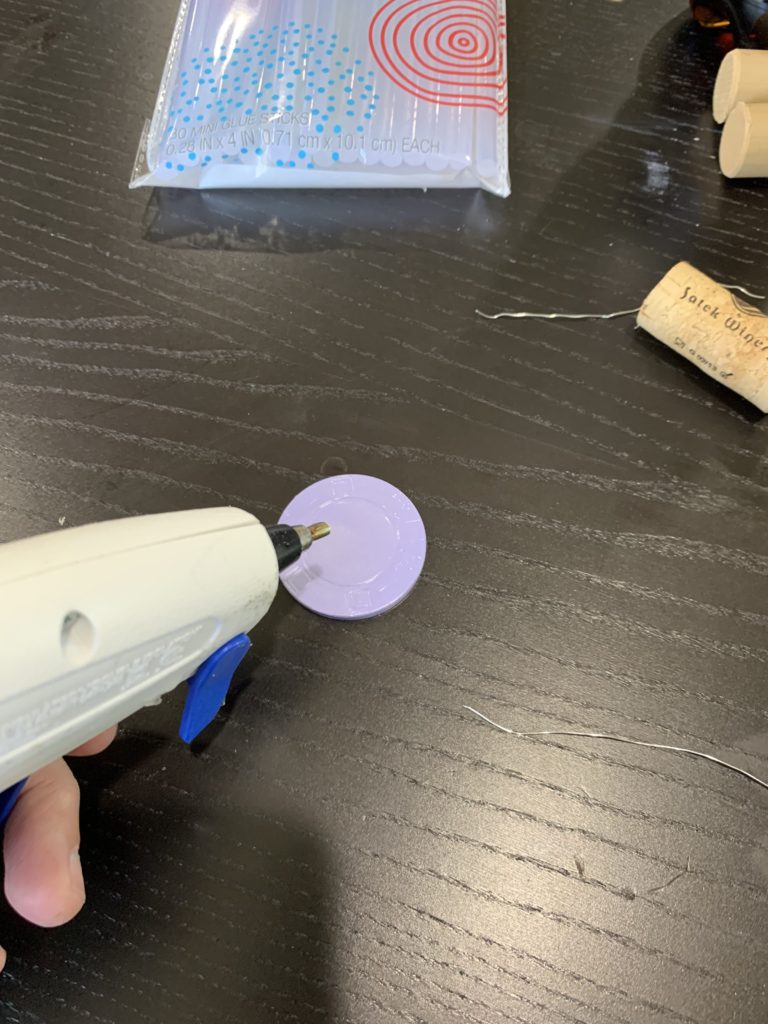
Step 4. Using the hot glue gun, glue the cork to the painted poker chip. Since I had corks from a variety of different wineries, I tried to glue them so the name of the winery or design was easily displayed.
Put a dot of hot glue in the center of the poker chip.
Place the cork on the poker chip. I tried to make the winery name or design easy to see.
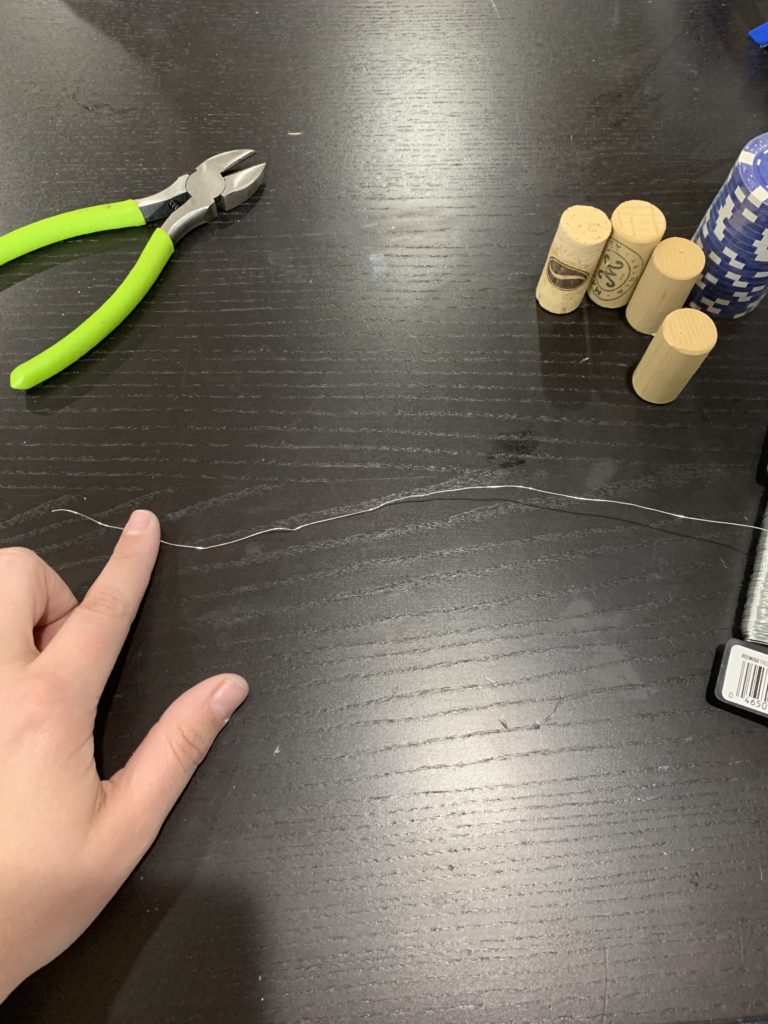
Step 5. While you are waiting on the hot glue to dry, you will form the wire loop which will hold the card. Cut the wire to be ~7″ in length. After cutting the wire, you will form a loop on one end. I found making 3 loops works the best.
Cut the wire and form the loops.
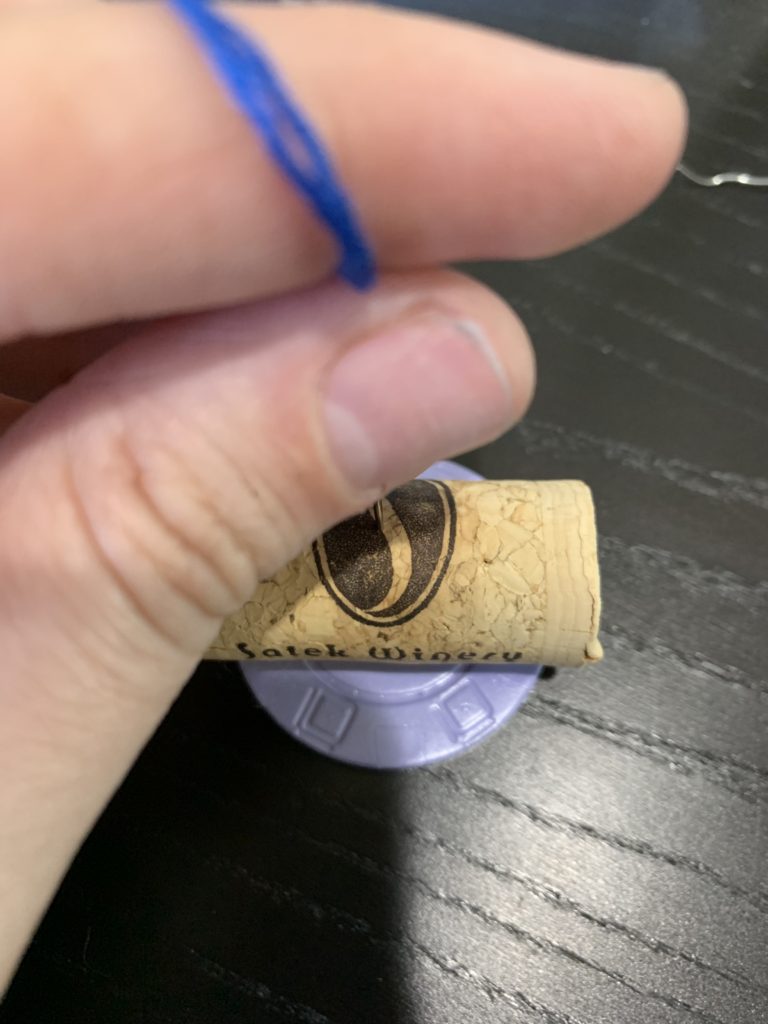
Step 6. Using a needle poke a small hole in the cork. I found this made it easier to put the wire into the cork.
I used a large needle to put a small hole in the cork.
Our new crochet pattern book
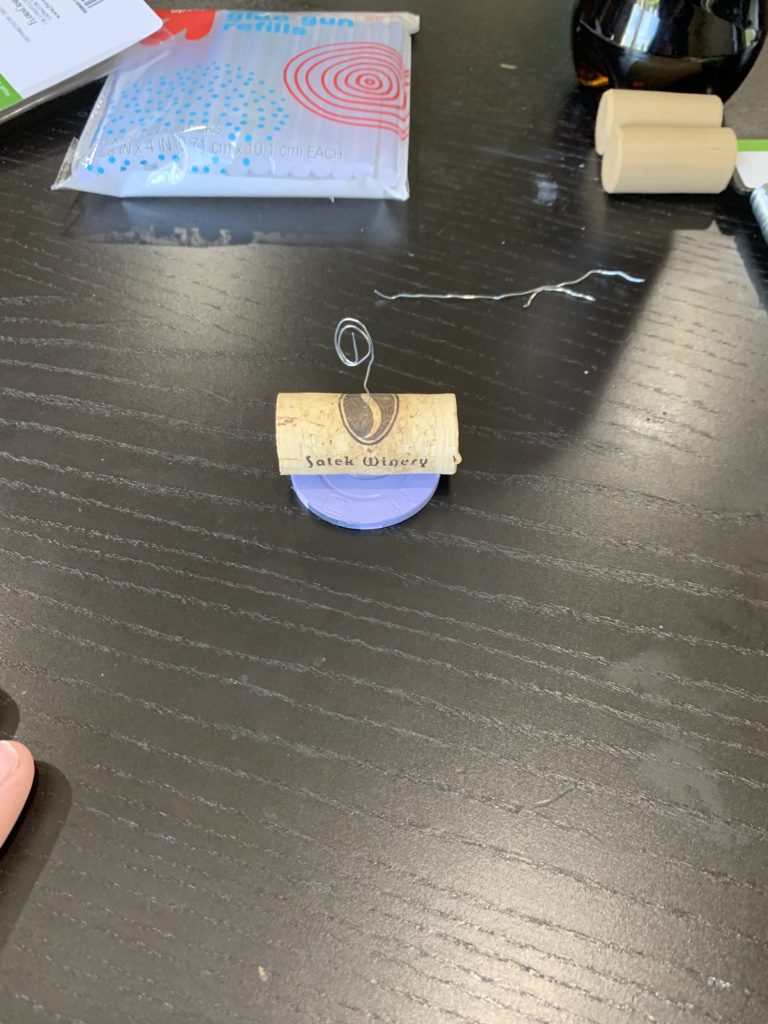
Step 7. After poking a small hole, insert the wire that you had made the loop with. You will put the straight end into the cork.
The wire should be placed in the cork like this.
Step 8. The holders are now complete, and it’s time to start making the actual cards. I made the name cards (which are printed on cream cardstock) in Microsoft Word. In Word, I made a table with 3 columns where each cell had a width of 2.5′ and a height of 0.6″. I typed the names each cell using Lucida Handwriting font 13. My husband also had a few young cousins attending, so I used Kristen ITC font 14 for their cards. I thought this font looked like something a little kid would write.
Step 9. Print the Microsoft Word document on the cream card stock. After printing, you will cut each name card out.
Step 10. Next, I used my Cricut to cut out the accent color portion of the place card. I made a table in Microsoft Word that I snipped and saved. If you are interested, I used the image below for this project. I imported this image to the Cricut Design Space. You will expand this so it will be approximately 12″ wide. You want it to fit on the 12×12 mat.
The table used to cut accent color portion of the place cards. Click the image for the actual size photo.
Step 11. Cut the card using the Cricut. After cutting, you will remove the accent color portion of the place card from the mat.
Step 12. Using a glue stick, glue the cream cardstock name plate to the accent card in the middle. You will want to try to place the cream cardstock in the exact middle of the accent cardstock.
Step 13. Once you have your table assignment complete, you will need to write a table number on the card. I used a purple Sharpie pin to write the table numbers, but you can use any marker of your choice.
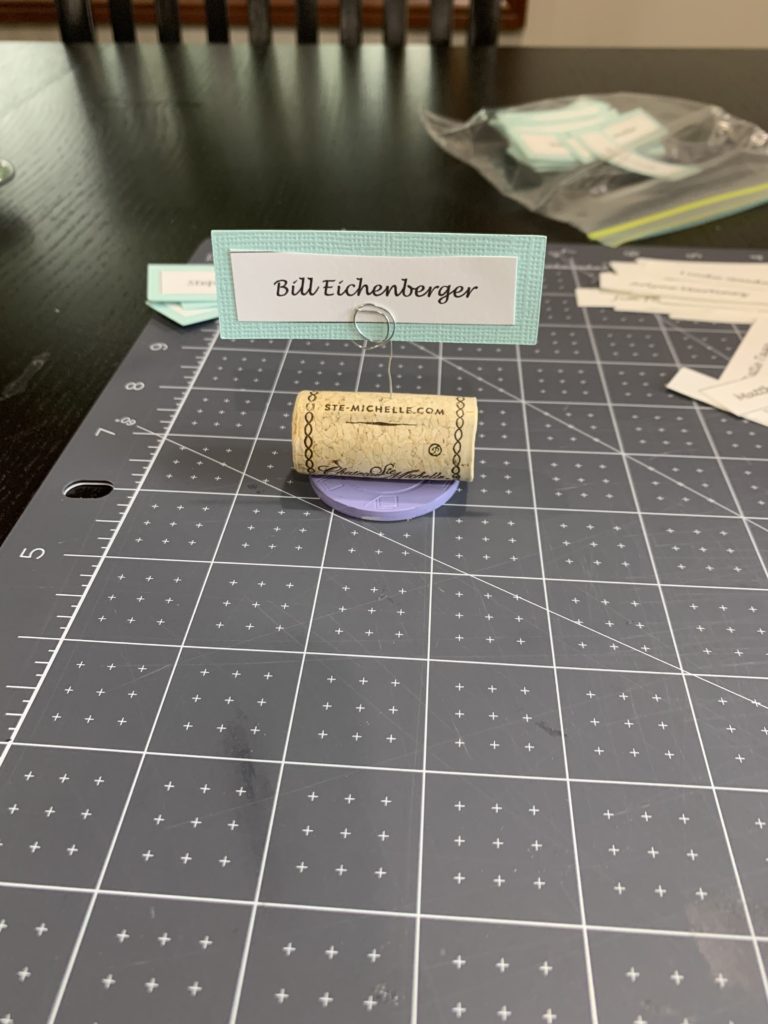
Step 14. You can then place the name card on the poker chip wine cork holder using the loops. The image below shows an example.
Completed Place Card!
The place cards are complete! I received many compliments on these place cards. Hope you can use this tutorial for your own wedding escort cards!
If you liked this tutorial, check out our other wedding decor tutorials:
Disclosure: CraftEaze is a participant in the Amazon Services LLC Associates Program, an affiliate advertising program designed to provide a means for sites to earn advertising fees by advertising and linking to Amazon.com and affiliate sites.
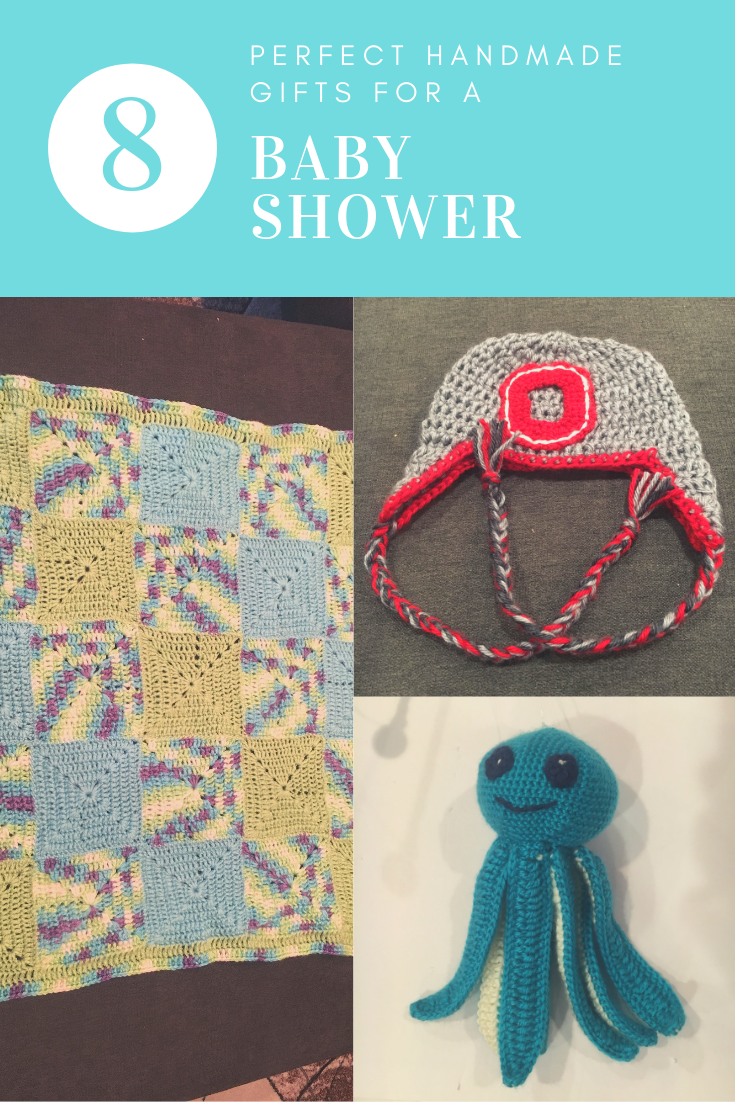
So I have now reached a point in my life where many of my friends and family members are starting to have babies. So over the past few years, I have made several projects for the expecting mother. This is a list of my 8 favorite handmade gift ideas that you can make for the next baby shower you are invited too.
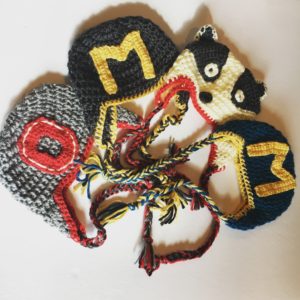
1. Newborn Hat
Collection of college themed hats.
One of my favorite items to make is college-themed newborn hats. I have a personal Etsy store (not tied to CraftEaze) where I sell these hats. They are probably one of the most popular items in my store. These hats are pretty versatile. They can be used as a photo prop for baby pictures. They also can be worn on game day.
Since I live in Ohio, I know many people who are Ohio State fans. So a perfect baby shower gift for a friend or coworker could be an Ohio State hat along with a set of Buckeye onesies.
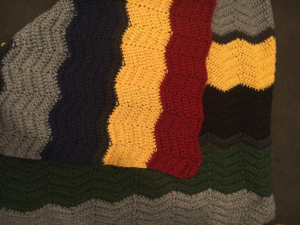
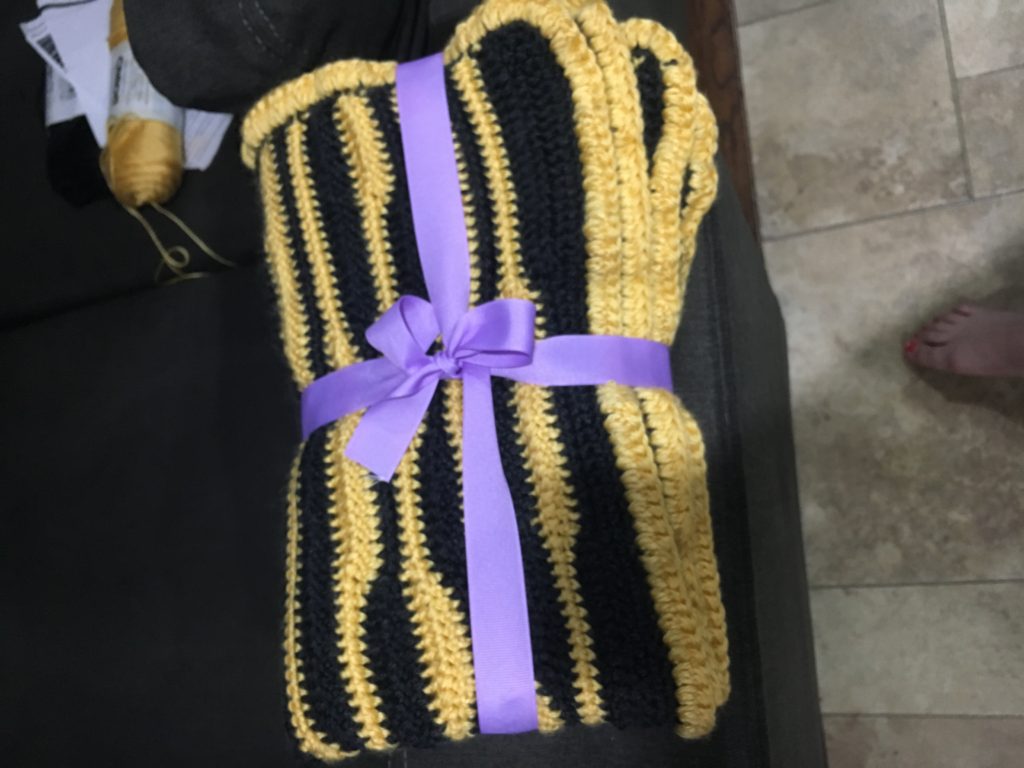
2. Crochet Baby Blankets
Hogwarts inspired baby blanket that I sold on Etsy.
Baby blankets are one of my favorite project to make. I like making baby blankets because they are so much faster then blankets for adults. You can also personalize the blanket to match a nursery or an interest of the parents.
I made a Hogwarts inspired chevron baby blanket a while back using this pattern that I sold on Etsy. Each house was represented in this blanket. You can see a picture of this particular blanket at the start of this section.
Missouri Tiger stripe blanket
I made an extra special baby blanket for my friend from college that is a Mizzou fan last year that was tiger stripped. This pattern is fairly easy and has a very cute result. You can also use this pattern to make a zebra stripe blanket for a baby girl.
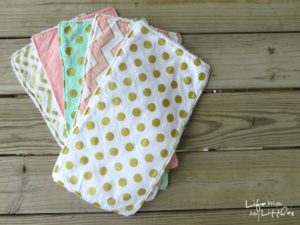
Maybe you are looking for a quick project to go with your favorite baby book, teething ring, or quilted baby blanket. Burp rags are the perfect project if you know how to sew. This pattern is very easy to understand. You can even use the scraps from a baby blanket to make a couple of
If you have time, a cross stitch/embroidery pre-stamped quilt may be the perfect gift. There are many cute options out there ranging from the alphabet to Noah’s arc to cars and trucks. These kits can take some time to complete, so you may need to start once you hear your friend or family member is expecting.
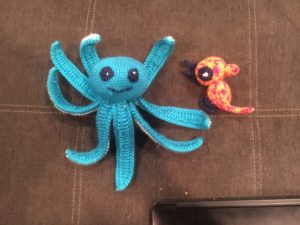
5. Crochet Toy
Crochet toys from a under the sea mobile.
Another fun thing you can make for a baby shower is a crochet toy. My favorite crochet toy I have ever made is the baby octopus. The pattern I used can be found here. I like it because you can make it fairly fast. The head is also big enough that you insert a rattle noise maker.
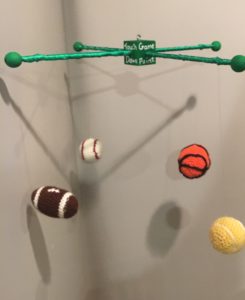
6. Baby Mobile
Sport Theme Baby Mobile
Another idea that may take a little while to make is a baby mobile. The baby mobile can be made to match the nursery. I have made a couple of mobile in the past. One was an under the sea mobile that had several different sea animals hanging from the wooden structure. I also made the sport themed mobile pictured above. The third mobile was one that had 4 elephants in pastel colors.
7. Embroidery Baby Bib
If you like to embroider or cross stitch but do not have the time to make a quilt, a couple of baby bibs are the perfect gift. You can find bibs with so many different designs. Two of my favorites are this safari bibs and this frog and turtle bibs.
Another project you can make for a baby shower is a cute wall hanging for the nursery. You can make a wall hanging using a Cricut. There are so many options for these types of wall hangings. You can make one with the baby name listed or one that has an inspirational quote. The instructions on this blog postis very through. It walks you through step by step to make a wall hanging.
Disclosure: CraftEaze is a participant in the Amazon Services LLC Associates Program, an affiliate advertising program designed to provide a means for sites to earn advertising fees by advertising and linking to Amazon.com and affiliate sites.
Christmas will be here before you know it, and that means its time to go holiday shopping. I enjoy trying to find gifts for my friends and family members that I know they will love. I like to find everyone on my list a gift that they wouldn’t necessarily buy themselves, but something that they would use. For example, last year I got my mom a pi pie pan that had several digits of pi on the bottom of the pan. I also got my sister and brother-in-law a game to play with their friends on game night or at parties.
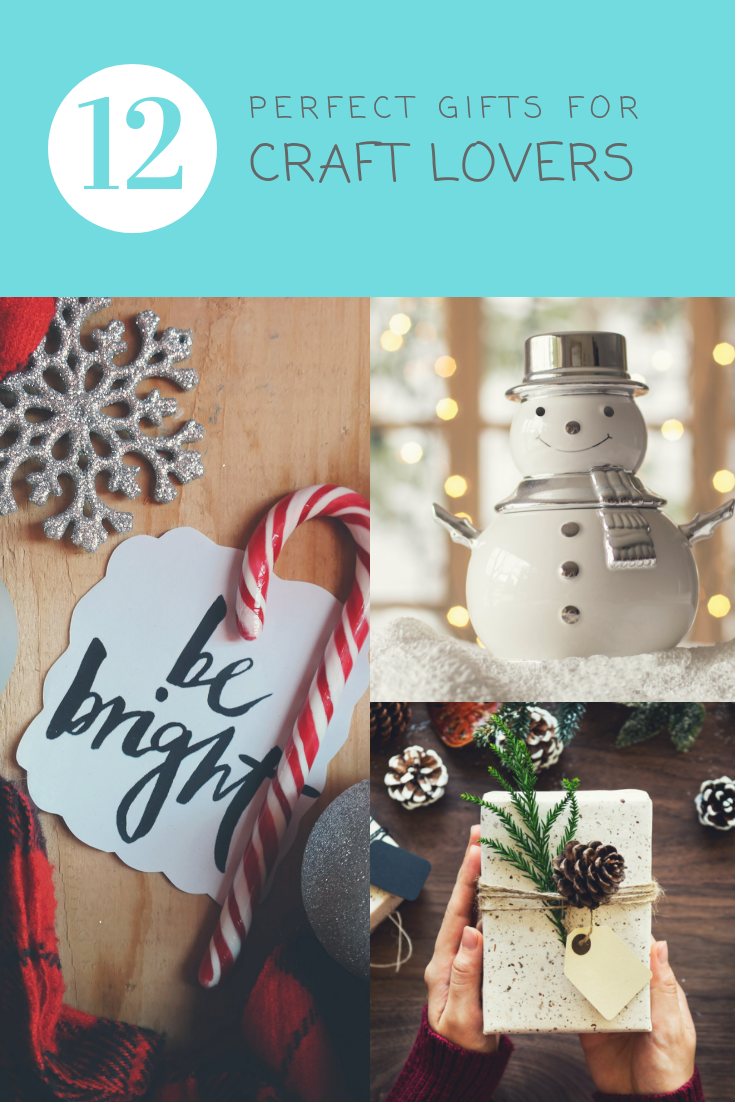
In this post, I will go over the 12 perfect gifts for the craft lover in your life. The reason that there are 12 gifts is the 12 days of Christmas. Unlike the 12 days of Christmas, this list consists of zero birds (unless you count amigurumi)!
A yarn bowl is the perfect gift for the crocheter or knitter in your life. This bowl will keep the ball of yarn you are using in a container that also feeds the yarn to you. The bowl can keep the ball of yarn from rolling all over the living room. It can also act as a holder for your project. You can find some really cute yarn bowls on Etsy like this Ravenclaw bowl.
2. Fun Crochet Books
Christmas is also the perfect time to buy a loved one a fun book of crochet patterns. You can buy a book that they may not typically buy themselves. Some possible ideas are books for Amigurumi (small animals or objects) or a book full of fun modern patterns.
I have crochet hooks and knitting needles scattered all over the 1st floor of my house. I’m sure other people have the same problem. A portable needle and hook organizer would be the perfect solution that not only looks cute but is also functional.
So on Black Friday, I bought a Cricut online from Wal-Mart. My only regret is not buying this months ago! It is so much fun to use and so far it has been easy to use. Last night my fiancée and I learned how to make vinyl stickers. I see us using this machine a lot in the future ranging from stickers to personalize our Yeti tumblers to making bumper stickers for our friends to wedding decor. I am really excited for my Cricut! It would be the perfect gift for the person in your life that like to scrapbook, make paper crafts, signs, or even things made out of felt.
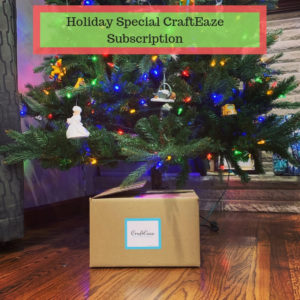
5. Crochet Monthly Subscription
Another idea for the person who loves to crochet would be a subscription to a monthly subscription box. CraftEaze has a special holiday subscription with 3-12 month option. The first box will be shipped immediately after purchase and the project will be gift wrapped. This way it can be placed right under the tree. We also have another year-long subscription box which is a corner to corner mystery project. You can find this project here and it will begin in January.
6. Cricut Accessories
If the person you love already has a Cricut, you can always buy them accessories for their machines. There are some variety packs of mats. Until I bought my cricket, I didn’t know that you needed different mats depending on the material. Like fabric uses a different mat the paper. You can also get them a set of tools that they can use with the Cricut that includes scissors and a weeding tool. If they are wanting to learn how to make t-shirt, you can buy them an Easy Press.
7. Learn How To Knit or Crochet Kit
If you have a young cousin, child, niece, or nephew that you would like to get into knitting or crochet, then this kit is for you. This fuzzy knitting kit comes with yarn that is in fun, kid-friendly colors with plastic knitting needles and patterns. This is a crochet version that includes the yarn, a plastic hook, and patterns. Both are perfect kits to introduce young kids to the yarn crafts.
8. Candle Making Kit
Maybe the person who loves crafts in your life has been talking about making candles recently. Like maybe they have been dropping hints like “It would be cool to learn how to make a candle” or “Why can’t an evergreen candle come in purple?”. This kit comes with everything you would need to make a colorful scented candle.
9. Adult Coloring Books
I know it may sound cheesy, but adult coloring books are a great tool for relaxation! These books are perfect for a stocking stuffers. There are so many cool adult coloring books on the market these days ranging from Disney coloring books and Harry Potter coloring books to curse word color booking. Just don’t forget to buy the recipient a set of color pencils.
10. Jewelry Making Kit
Maybe the person you are shopping for enjoys essential oils. Why not get them a kit to teach your loved one how to make jewelry that doubles as an essential oil diffuser?
11. Soap Making Kit
If you have a child that you want to get into crafting but also provide a fun science experiment, then you should look into buying a soap making kit. This soap making kit is not only easy to use but also teaches the child about the science behind the process along with the history. So if anyone asks, you are helping teach the child about new things!
12. Tote For Their Crafts
One thing I always wish I have more of is a tote to carry my crafts from point A to point B. I’m sure other people have the same issue where they can’t find a good tote or bag to hold their project. There are so many cute totes out there. I’m sure you can find a design that fits that special someone’s personality.
Hope you are able to find the perfect gift for the craft lover in your life!
There are some big new products available here at CraftEaze. Both products would make great holiday gifts for the person in your life that loves to crochet. The two new products are a special holiday subscription box and a year-long crochet along project.
The first new product I’m going to talk about is the special holiday subscription box. This subscription box is similar to the monthly crochet subscription service, but it can be purchased for a specific time frame. We have options for 3 months, 6, months, 9 months, and 12 months subscriptions.
Our special holiday edition of the crochet subscription box.
Since this is a special holiday edition, we will ship the first box immediately after ordering. We have an option for gift wrapping. This way, all you will need to do is put the gift-wrapped box under the tree with the special holiday card with a note stating the number of months in the subscription. We have three card options ranging from “Rustic Christmas”, “Snowman”, and “Owl Christmas”. If you would like to see cards, visit here.
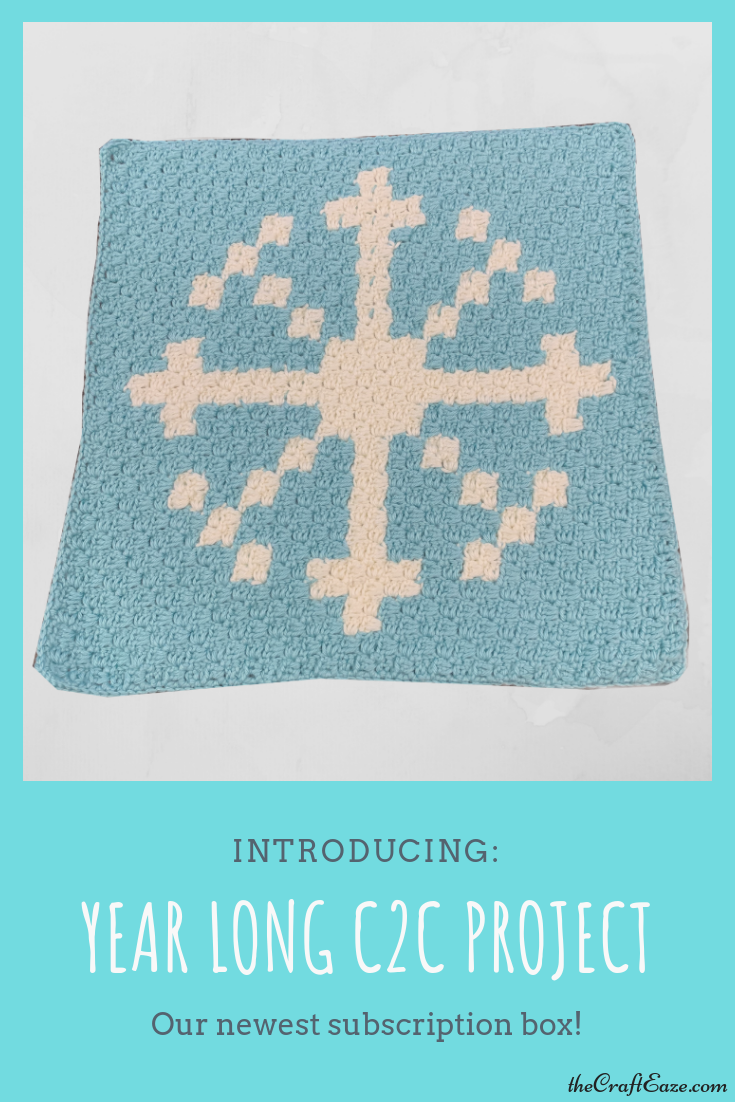
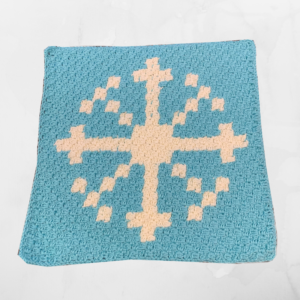
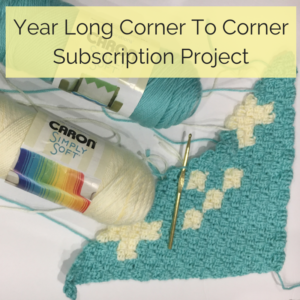
The second new product is the one I’m the most excited about! It is a year-long subscription box for a corner to corner crochet along. Each month you will receive the materials and pattern for a corner to corner block. This block will be related to the month in some way. The first month is January and the block will be a snowflake.
The January block is a snowflake.
Each block will be approximately 17″x17″. After 12 months, you will have made 12 blocks related to the 12 months in a year. The nice thing about this project is that you can jump in at any time. If you purchase this subscription box, you will receive a box for 12 months. For the last month, you will receive the instructions for the final block along with the instructions to finish the blanket. To learn more about this crochet-along, visit here.
Disclosure: CraftEaze is a participant in the Amazon Services LLC Associates Program, an affiliate advertising program designed to provide a means for sites to earn advertising fees by advertising and linking to Amazon.com and affiliate sites.
The holiday season is upon us. Thanksgiving is tomorrow and then it will be time to start decorating for Christmas (unless you have already started). There are so many different holiday decorations out there from the Christmas tree to Rudolph and Frosty in the yard to nativity scenes to stockings.
Christmas stocking on the fireplace mantle last year.
I will probably start to decorate for Christmas this weekend. The last several years, my fiancee and I have put stockings on the fireplace mantle. We both put small presents for each other inside the stocking each year.
I remember opening my stocking every year growing up. My sister and I stockings when we were younger had Mickey Mouse characters on top. When we moved to the new house, I remember we were able to pick out a new stocking and we picked stockings that sorta related to our personalities. A few years back my mom bought new stockings for my sister, her now-husband, my fiancee, and me that all had our names on them and matched.
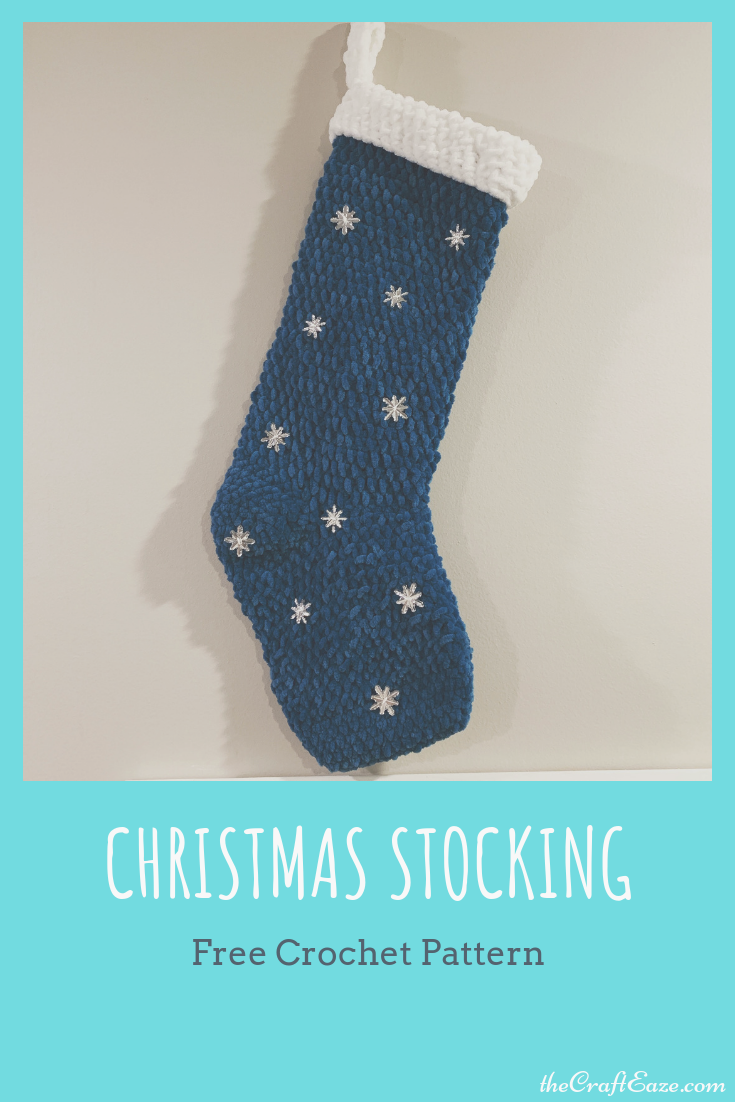
The December CraftEaze crochet project will help you get into the holiday spirit! This month’s project is for a Christmas stocking that has snowflakes on it. This stocking uses bulky yarn, so it works up quickly. You should be able to make the stocking in a couple of evenings or over the weekend. The snowflakes are these cute buttons that I found at WalMart for a couple of dollars.
The crochet pattern can be found below. This stocking is worked from the toe up. We have the kit for sale on our website here. You can also buy a printer-friendly pdf on Etsy.
Gauge is not super important for this project. A 4” by 4” square is approximately 13 hdc in for 12 rows.
Stocking
Toe (Work in Rounds)
Chain 15.
Round 1: Sc in 2nd chain from hook. Sc in next 13 chains. Sc in the other side of the chain you just made the sc in. Sc in next 13 chain. Join to the 1st sc. Chain 1 (28 sc).
Round 2: 2 sc in the first sc (Place marker in the first sc). Sc in next 13 sc. 2 sc in the next sc. Sc in next 13 sc. Do Not Join (30 sc).
Round 3: 2 sc in the first sc (Place marker in the first sc). Sc in next 14 sc. 2 sc in the next sc. Sc in next 14 sc. Do Not Join (32 sc).
Round 4: 2 sc in the first sc (Place marker in the first sc). Sc in next 15 sc. 2 sc in the next sc. Sc in next 15 sc. Do Not Join (34 sc).
Round 5: 2 sc in the first sc (Place marker in the first sc). Sc in next 16 sc. 2 sc in the next sc. Sc in next 16 sc. Do Not Join (36 sc).
Round 6: Sc in each sc. Place marker in the first sc. (36 sc).
Round 7: Hdc in each sc. Place marker in the first hdc. (36 hdc).
Round 8-18: Hdc in each hdc. Place marker in the first hdc. (36 hdc).
Heel (Worked in rows)
Row 19: 18 sc, turn.
Row 20: Chain 1, sc in the next 17 sc. Turn. Leave 1 sc unworked.
Row 21-25: Chain 1, sc in each sc leaving 1 sc unworked on each row. Turn. Row 25 will have 12 sc.
This is what the stocking looks like before holding the white section.
Row 26: Chain 1, sc in the each sc. Work sc into the unworked sc of the row below. Sl st into the unworked sc in the next row. Chain 1 and turn. (13 sc).
Leg (Worked in Rounds)
Round 32: Sc in each sc. Put marker in first sc (36 sc).
Round 33: Hdc in each sc. (36 hdc).
Round 34-61: Hdc in each hdc. (36 hdc).
Join the white yarn.
Round 62-68: Hdc in each hdc. (36 hdc).
Round 69: Sc in each hdc. Join to the first sc and tie off. (36 sc).
Fold over the white section to have ~1” overlay. You will tact the folded over white section using the white thread.
After tacting the white section, You will add the stars to the stocking using the white thread.
Loop To Hang Stocking
Chain 5.
Row 1: Dc in 3rd chain from the hood. DC in next 2 chains (3 dc).
Row 2: Chain 1, turn. Dc in each of the dc (3 dc).
Repeat row 2 until it is approximately 5” long.
Attach loop to stocking by sewing the two short edges together to the stocking.