Some links posted below may be affiliate links, which means I’ll earn a tiny commission if you purchase through them.
My husband and I visited Lake Tahoe on our honeymoon. While it was absolutely beautiful, we decided to take a day trip to Yosemite National Park—and it was completely worth the early morning drive.
Yosemite was breathtaking. We stopped at several overlooks to take in the incredible views and went on a hike where we could see El Capitan in the distance. Seeing such an iconic landmark in person made the experience even more special.
I would love to go back one day and spend more time exploring the park. When designing this crochet block, I knew I had to include El Capitan to capture the beauty and scale of Yosemite.
Materials
For this block, you will use the green, grey, and dark blue yarn. Please visit the first blog post introducing this pattern for instruction on how to do corner-to-corner. You can also purchase a printer-friendly pattern with all 12 blocks on Etsy.
Chart
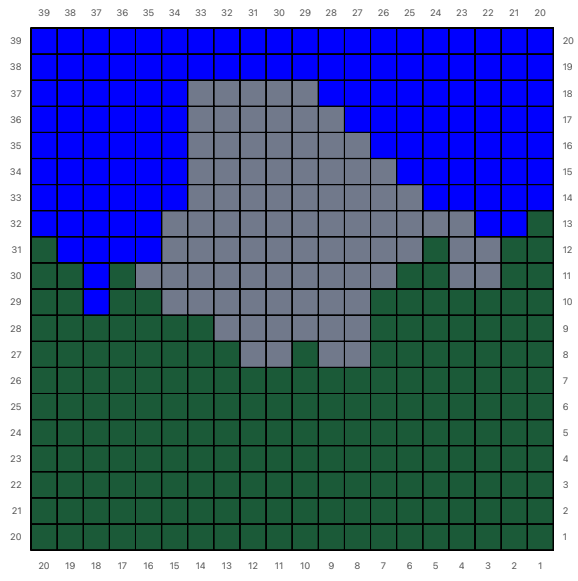
Written Instructions
Please note, all lines are increases until reaching a corner, decreases will be noted in the instructions.
Row 1: Green.
Row 2: Green 2.
Row 3: Green 3.
Row 4: Green 4.
Row 5: Green 5.
Row 6: Green 6.
Row 7: Green 7.
Row 8: Green 8.
Row 9: Green 9.
Row 10: Green 10.
Row 11: Green 11.
Row 12: Green 12.
Row 13: Green 10, Gray, Green 2.
Row 14: Dark Blue 2, Gray 2, Green 10.
Row 15: Green 7, Gray, Green 3, Gray, Dark Blue 3.
Row 16: Dark Blue 3, Gray, Green 3, Gray 2, Green 7.
Row 17: Green 8, Gray 5, Dark Blue 4.
Row 18: Dark Blue 5, Gray 6, Green 7.
Row 19: Green 7, Gray 7, Dark Blue 5.
Row 20: Dark Blue 6, Gray 6, Green 8.
NOTE: Decrease each row when starting on left edge.
Row 21: Green 7, Gray 7, Dark Blue 5.
Row 22: Dark Blue 5, Gray 6, Green 7.
Row 23: Green 6, Gray 7, Dark Blue 4.
Row 24: Dark Blue 4, Gray 7, Green 5.
Row 25: Green 5, Gray 7, Dark Blue 3.
Row 26: Dark Blue 3, Gray 7, Green 4.
Row 27: Green 2, Dark Blue, Green, Dark Blue, Gray 6, Dark Blue 2.
Row 28: Dark Blue 2, Gray 4, Dark Blue 4, Green 2.
Row 29: Green 2, Dark Blue 4, Gray 3, Dark Blue 2.
Row 30: Dark Blue 2, Gray 2, Dark Blue 5, Green.
Row 31: Green, Dark Blue 5, Gray, Dark Blue 2.
Row 32: Dark Blue 8.
Row 33: Dark Blue 7.
Row 34: Dark Blue 6.
Row 35: Dark Blue 5.
Row 36: Dark Blue 4.
Row 37: Dark Blue 3.
Row 38: Dark Blue 2.
Row 39: Dark Blue.
Blocking and Assembly
Now that the blocks are completed, I recommend blocking to ensure the blocks are the same size. My blocks ended up being 11″x11″. Your blocks might be a little smaller or a little bigger, and that is ok.
After blocking, you will assemble the blocks. I put my blocks in alphabetical order, but you can use any order that you want. Be creative! My husband had me lay them out in geographic order, and that looked cool too. You can use any method you would like to join the blocks. I did not want to make a border around the blocks, so I used this method to join the blocks.
Holding two blocks together, you will join the yarn to the top corners and make a sc. You will then chain 2 and make a sc in the space between the next pixel. Repeat this process down the block. You will continue this until you have reached the end of the first vertical seam. You will repeat for the second vertical sem using the same process. Then use this same process to make the horizontal seams.
I hope you enjoyed making this blanket as much as I did. Happy Crafting!