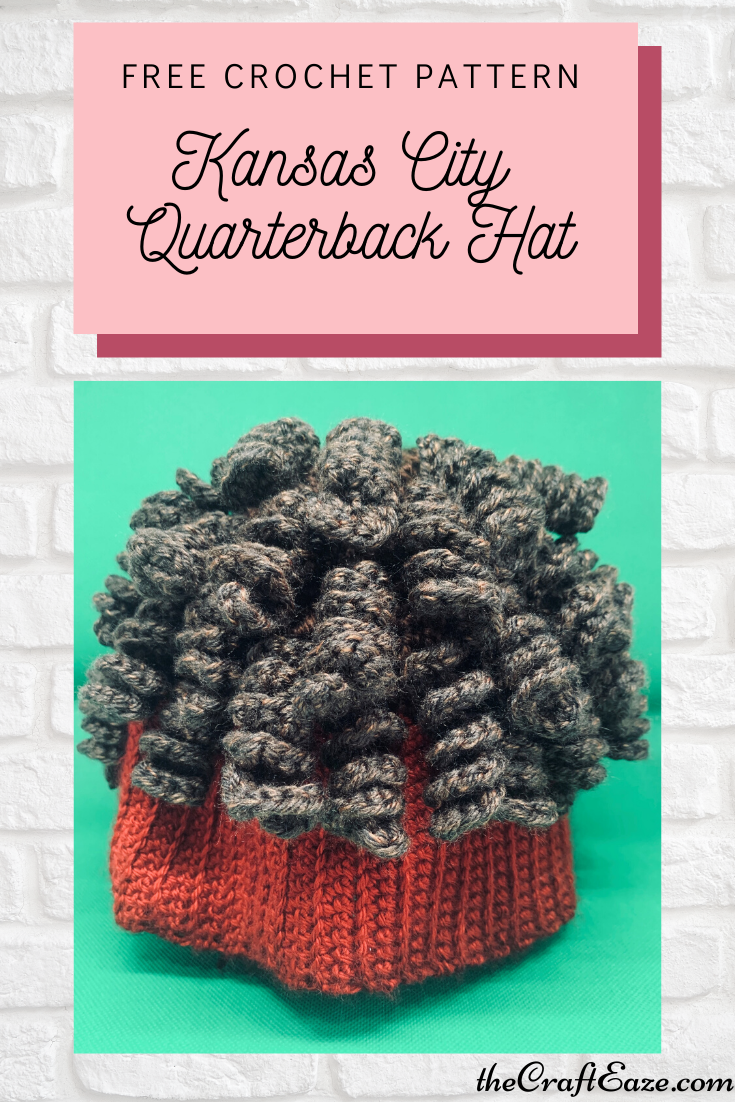
Football is one of my favorite sports. Growing up in Missouri, that meant that there was only one team to root for, the Kansas City Chiefs! Keep in mind, this wasn’t always easy. I remember many rough seasons, but recently the tides have turned.
Disclosure: CraftEaze is a participant in the Amazon Services LLC Associates Program, an affiliate advertising program designed to provide a means for sites to earn advertising fees by advertising and linking to Amazon.com and affiliated sites.
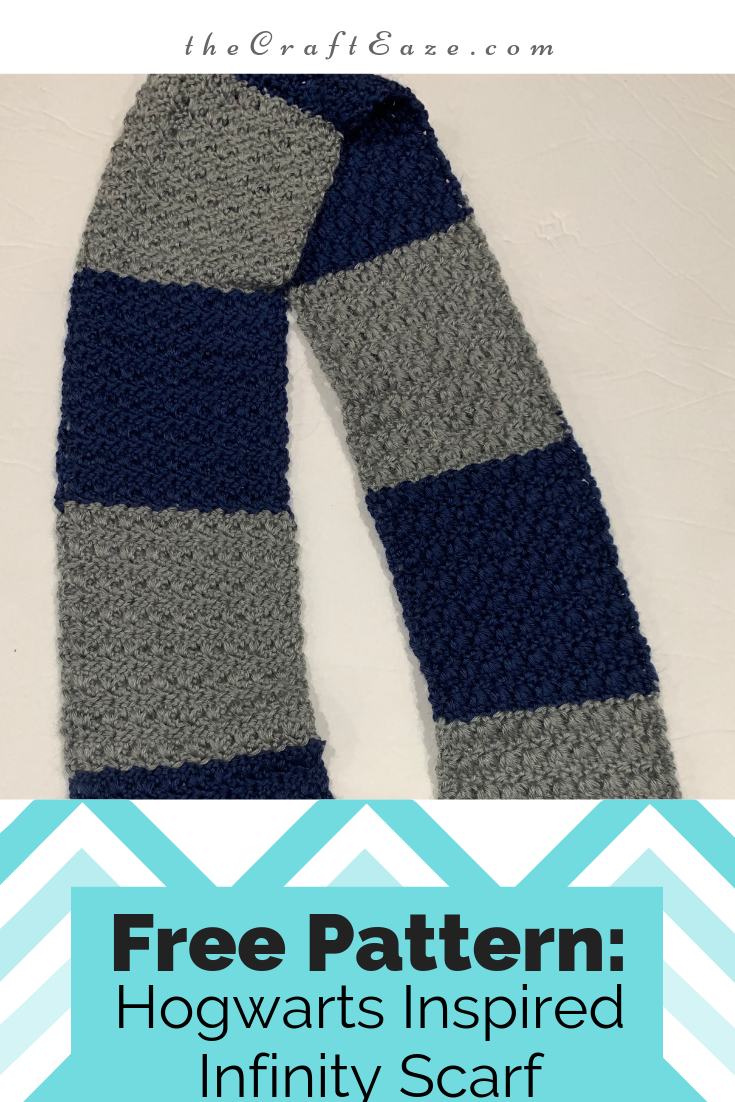
Fall is just around the corner. Fall is one of my favorite seasons, there is football, apple cider, bonfires, and boot and scarf season officially begins! This scarf is perfect for the fall season!
This scarf is inspired by the Hogwarts Houses in Harry Potter. It can be made in a weekend easily for a Halloween costume. This scarf uses a primrose stitch. This video gives a short overview of how to make this stitch. I think it gives this scarf a feminine touch and also makes it a little different from the other Hogwarts inspired scarves so you can wear it all fall and winter long.
You can find a printer-friendly version of this pattern here. We also have kits for sale for this project. You can select your favorite house or take a chance with our magic sorting hat option.
Just as a reminder, here are the Hogwarts house colors.
Row 1: Work [1 sc, 2 ch, 1sc] in 3rd chain from hook. *skip next 2 chains, [1 sc, 2 ch, 1 sc] in next chain. * repeat across ending with 1 hdc in last ch. Turn. (9 sc 2 spaces).
Row 2: Ch 3, *3 dc in the next ch 2 space* . Repeat across ending with 1dc in the top of the turning chain. Turn. (9 shells of 3 dc).
Row 3: Ch 2 (counts as the first hdc). *[1 sc, 2 ch, 1 sc] in the 2nd dc of the next shell (middle dc of the shell)*. Repeat across ending with 1 hdc in top of the turning ch. Turn.
Rows 4-17. Repeat rows 2-3.
Change to the secondary color.
Rows 18-33. Repeat rows 2-3.
Change to the primary color.
Rows 34-49. Repeat rows 2-3.
Change to the secondary color.
Rows 50-65. Repeat rows 2-3.
Change to the primary color.
Rows 66-81. Repeat rows 2-3.
Change to the secondary color.
Rows 82-97. Repeat rows 2-3.
Change to the primary color.
Rows 98-113. Repeat rows 2-3.
Change to the secondary color.
Rows 114-129. Repeat rows 2-3.
Change to the primary color.
Rows 130-145. Repeat rows 2-3.
Change to the secondary color.
Rows 146-161. Repeat rows 2-3.
There should be 5 primary color sections and 5 secondary color sections. You will join the top and bottom to form an infinity scarf using a needle. Fasten off.
Hope you enjoy making your own Hogwarts inspired infinity scarf! What House did you choose?
Disclosure: CraftEaze is a participant in the Amazon Services LLC Associates Program, an affiliate advertising program designed to provide a means for sites to earn advertising fees by advertising and linking to Amazon.com and affiliate sites.
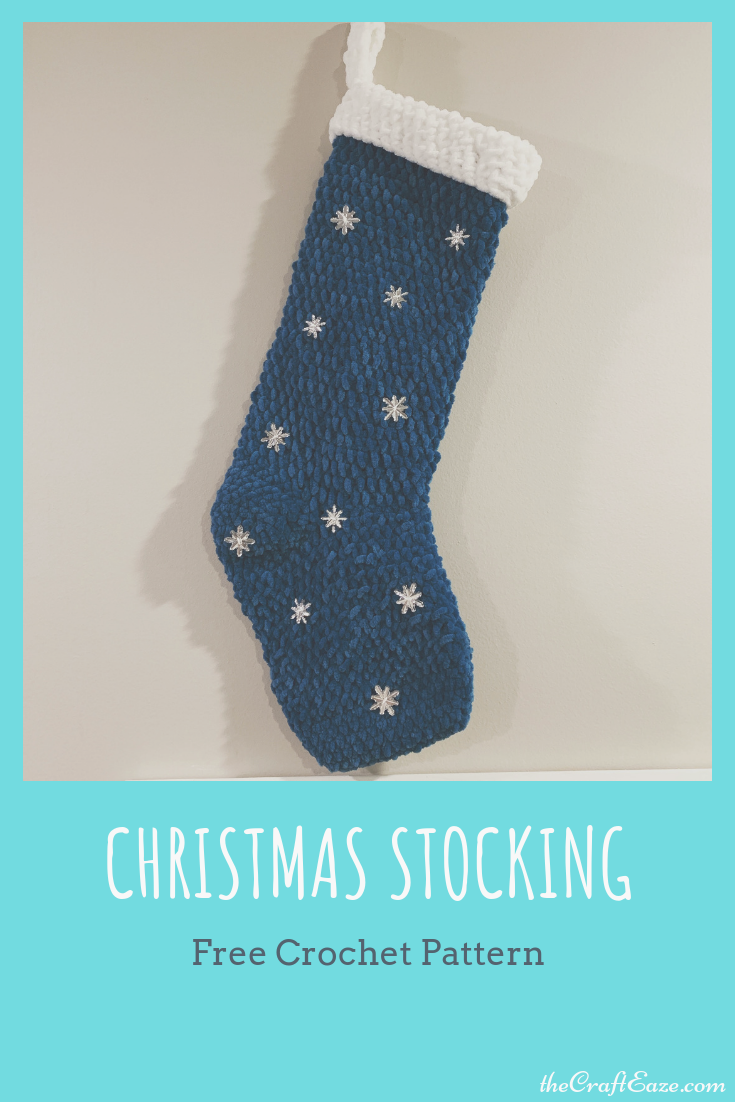
The holiday season is upon us. Thanksgiving is tomorrow and then it will be time to start decorating for Christmas (unless you have already started). There are so many different holiday decorations out there from the Christmas tree to Rudolph and Frosty in the yard to nativity scenes to stockings.
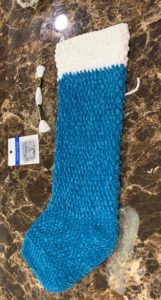
Christmas stocking on the fireplace mantle last year.
I will probably start to decorate for Christmas this weekend. The last several years, my fiancee and I have put stockings on the fireplace mantle. We both put small presents for each other inside the stocking each year.
I remember opening my stocking every year growing up. My sister and I stockings when we were younger had Mickey Mouse characters on top. When we moved to the new house, I remember we were able to pick out a new stocking and we picked stockings that sorta related to our personalities. A few years back my mom bought new stockings for my sister, her now-husband, my fiancee, and me that all had our names on them and matched.
The December CraftEaze crochet project will help you get into the holiday spirit! This month’s project is for a Christmas stocking that has snowflakes on it. This stocking uses bulky yarn, so it works up quickly. You should be able to make the stocking in a couple of evenings or over the weekend. The snowflakes are these cute buttons that I found at WalMart for a couple of dollars.
The crochet pattern can be found below. This stocking is worked from the toe up. We have the kit for sale on our website here. You can also buy a printer-friendly pdf on Etsy.
Gauge is not super important for this project. A 4” by 4” square is approximately 13 hdc in for 12 rows.
Stocking
Toe (Work in Rounds)
Chain 15.
Round 1: Sc in 2nd chain from hook. Sc in next 13 chains. Sc in the other side of the chain you just made the sc in. Sc in next 13 chain. Join to the 1st sc. Chain 1 (28 sc).
Round 2: 2 sc in the first sc (Place marker in the first sc). Sc in next 13 sc. 2 sc in the next sc. Sc in next 13 sc. Do Not Join (30 sc).
Round 3: 2 sc in the first sc (Place marker in the first sc). Sc in next 14 sc. 2 sc in the next sc. Sc in next 14 sc. Do Not Join (32 sc).
Round 4: 2 sc in the first sc (Place marker in the first sc). Sc in next 15 sc. 2 sc in the next sc. Sc in next 15 sc. Do Not Join (34 sc).
Round 5: 2 sc in the first sc (Place marker in the first sc). Sc in next 16 sc. 2 sc in the next sc. Sc in next 16 sc. Do Not Join (36 sc).
Round 6: Sc in each sc. Place marker in the first sc. (36 sc).
Round 7: Hdc in each sc. Place marker in the first hdc. (36 hdc).
Round 8-18: Hdc in each hdc. Place marker in the first hdc. (36 hdc).
Heel (Worked in rows)
Row 19: 18 sc, turn.
Row 20: Chain 1, sc in the next 17 sc. Turn. Leave 1 sc unworked.
Row 21-25: Chain 1, sc in each sc leaving 1 sc unworked on each row. Turn. Row 25 will have 12 sc.
This is what the stocking looks like before holding the white section.
Row 26: Chain 1, sc in the each sc. Work sc into the unworked sc of the row below. Sl st into the unworked sc in the next row. Chain 1 and turn. (13 sc).
Leg (Worked in Rounds)
Round 32: Sc in each sc. Put marker in first sc (36 sc).
Round 33: Hdc in each sc. (36 hdc).
Round 34-61: Hdc in each hdc. (36 hdc).
Join the white yarn.
Round 62-68: Hdc in each hdc. (36 hdc).
Round 69: Sc in each hdc. Join to the first sc and tie off. (36 sc).
Fold over the white section to have ~1” overlay. You will tact the folded over white section using the white thread.
After tacting the white section, You will add the stars to the stocking using the white thread.
Loop To Hang Stocking
Chain 5.
Row 1: Dc in 3rd chain from the hood. DC in next 2 chains (3 dc).
Row 2: Chain 1, turn. Dc in each of the dc (3 dc).
Repeat row 2 until it is approximately 5” long.
Attach loop to stocking by sewing the two short edges together to the stocking.
Disclosure: CraftEaze is a participant in the Amazon Services LLC Associates Program, an affiliate advertising program designed to provide a means for sites to earn advertising fees by advertising and linking to Amazon.com and affiliate sites.
Fall is one of my favorite seasons. There is so much to love about fall from football to bonfires. The best part in my mind is that I can start to wear boots and scarves whenever I want!
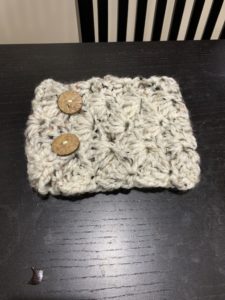
The November CraftEaze crochet box was boot cuffs which are the perfect fall accessory. This is an easy project that you can complete in a few hours just in time for Thanksgiving dinner. This is a project that you can show off to make your sister and cousins jealous when you stroll in for dinner. Thanksgiving is one of my favorite holidays. You don’t have to buy gifts for anyone and all you do is eat yummy food and watch football.
Here is finished boot cuff outside of the boot.
Here is the CraftEaze kit that will provide you with everything you would need to make this project. You can also get a printable pdf at Etsy.
Row 1: 1 sc in 2nd chain, *Skip 2 ch, 5 dc in next chain, skip 2 ch, 1 sc*, Repeat 1 time.
Row 2: Ch 3, 2 dc in first sc, skip 2 dc, 1 sc in next dc, skip 2 dc, 5 dc in sc, skip 2 dc, 1 sc in next dc, skip 2 dc, 3 dc in last sc.
Row 3: Ch 1, 1sc in the first dc, *skip 2 dc, 5 dc in sc, skip 2 dc, 1 sc in next dc*. Repeat 1 time.
Repeat Rows 2 and 3 until the cuff will fit around your leg. This will be approximately 10-12”. Weave in the yarn ends.
Finishing
You will attach 2 buttons to each cuff using scrap lightweight/medium weight yarn. Attach these buttons inside the last row that you crocheted. The 2 chain spaces in row 1 will provide the buttonholes.
Have fun making your own boot cuffs!
If you like this pattern and here are a few of our other pattern!
Disclosure: CraftEaze is a participant in the Amazon Services LLC Associates Program, an affiliate advertising program designed to provide a means for sites to earn advertising fees by advertising and linking to Amazon.com and affiliate sites.
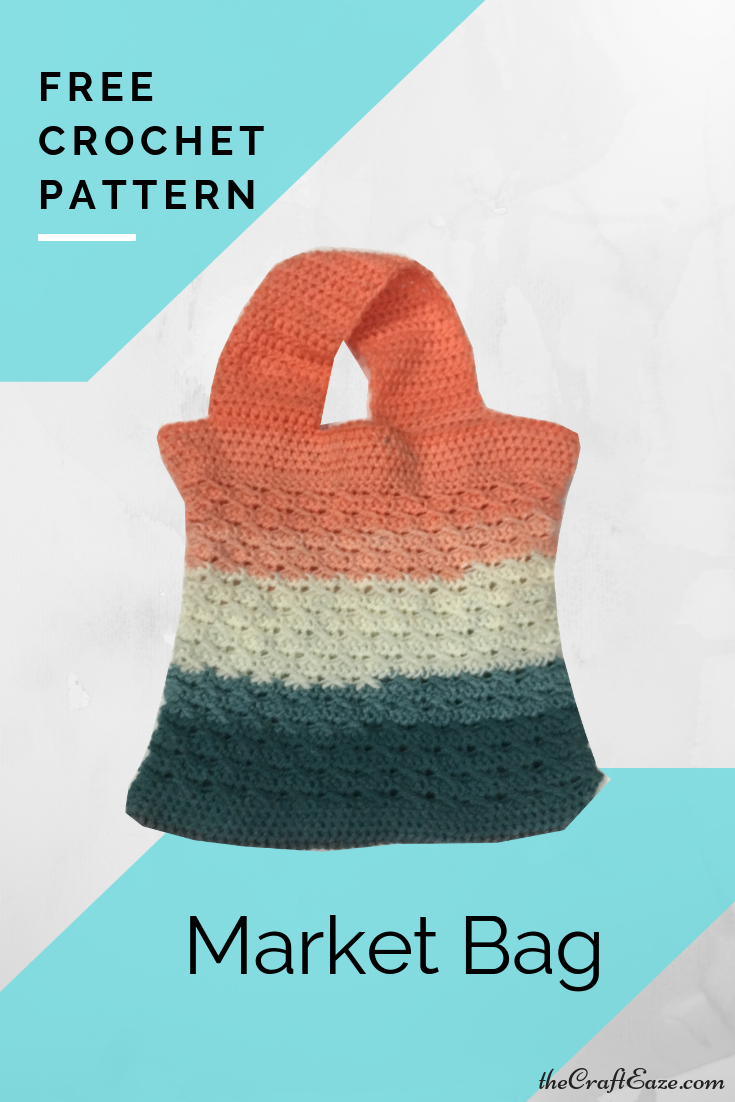
So life has been really crazy for the last few weeks, but I am finally getting around to announcing the October CraftEaze crochet project. The October crochet project is a market bag.
We are engaged!
So part of the reason life has been crazy is because I recently got engaged! So the number of wedding decor kits that CraftEaze sells will more than likely increase. Be on the lookout for new types of kits in the future.
October’s crochet CraftEaze project is for a market bag. This bag would be a good bag to keep in your car for quick after work Aldi trips. It could also be a good bag to take to the park or beach with a book, sunglasses, and sunscreen.
This bag uses an acrylic yarn that provides the bag with some stretch for purchases, but it is also strong. The yarn that is included in the CraftEaze kit creates nice blocks of different colors. If you would like to buy a kit for this project, you can visit here.
Materials To Make Bag
Below is a list of materials that you will need to make your very own market bag.
Round 1: Sc in 2nd ch from hook. 1 sc in the next 48 ch. 2 sc in last ch. You will now work on the other side of the chain. 1 sc in the next 48 ch (102 sc). DO NOT JOIN.
Round 2-5: Sc in each sc in the row below (102 sc). Do not join.
Round 6: Sc in each sc in the row below. Join the last sc to first sc (102 sc).
Round 7: Ch 3 (counts as first dc). *Skip first sc, 1 dc in each of the next 3 sc, yo and insert hook through (extending the loop that so it reached back to position of work and does not squish the 3 dc group). Yo and draw through first two loops on hook twice (this is called a long dc).* Repeat between the ** 24 times. Join to the top of ch 3 from the start of the row.
Round 8: Ch 1 (does not count as a stitch), 1 sc in the top of each dc. Join yarn to the first sc in the round.
Round 9-38: Repeat rounds 7 and 8 15 times.
Round 39: Sc in each sc. Do not join.
Round 40-44: Hdc in each sc around. Do not join.
Round 45: Ch 1 (does not count as a stitch). Hdc in 13 hdc. Turn.
Row 46: Ch 1 (does not count as a stitch). Hdc in the 13 hdc. Turn.
Repeat row 46 until the strap is approximately 24-30″ long.
Once the strap is approximately 24-30″ long, you will attach the strap to the opposite end of the bag. Fasten off.
You have now completed your very own market bag! Join our email list to be the first to learn about new products. Subscribe to our monthly crochet subscription box to get a project like this mailed to your door every month.
Disclosure: CraftEaze is a participant in the Amazon Services LLC Associates Program, an affiliate advertising program designed to provide a means for sites to earn advertising fees by advertising and linking to Amazon.com and affiliate sites.
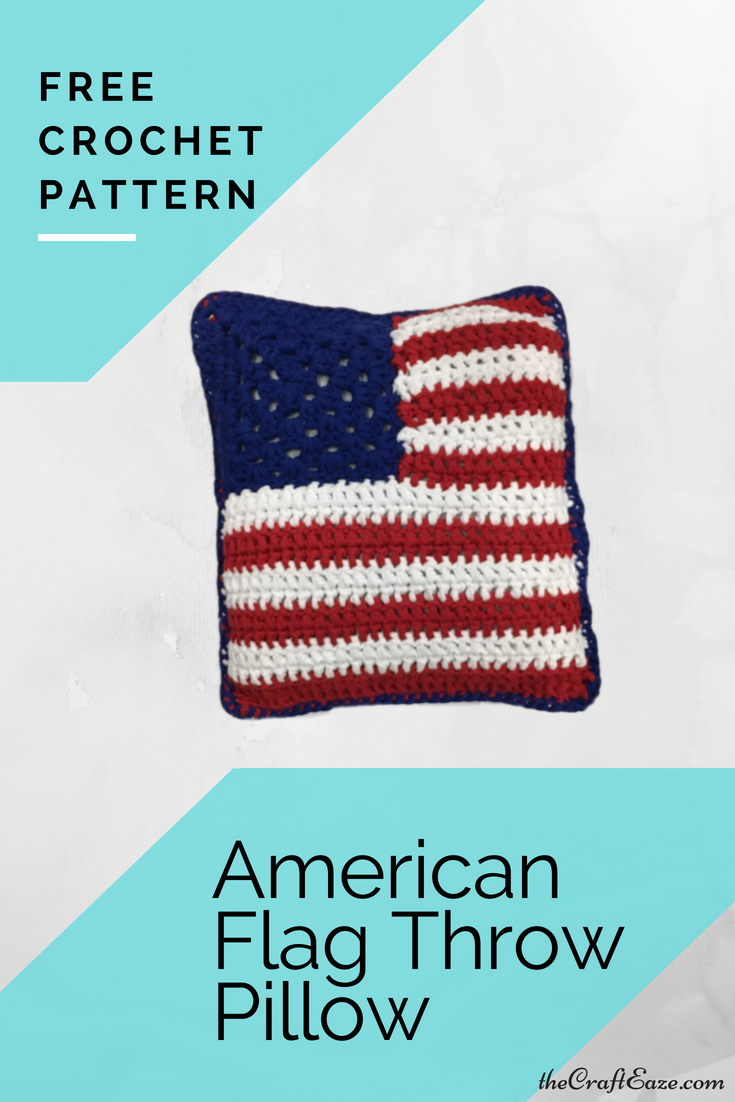
Summertime is official here and the 4th of July is just around the corner. I feel that its really easy to decorate your house/apartment for the 4th. Like if you put out a flag and a red/white/blue tablecloth, everyone compliments you on how festive your place looks. Sometimes, however, you want to put a little more effort into your decorating. This throw pillow is a perfect addition to your 4th of July decor collection.
Here are seven facts about the Declaration of Independence that you may not know.
56 people signed the Declaration of Independence.
Ben Franklin was the oldest signer of the Declaration of Independence (70 years old). Edward Rutledge was the youngest signer of the Declaration of Independence (26 years old).
8 signers were actually born in Britain.
During World War 2, the Declaration of Independence was housed in Fort Knox along with the Constitutions.
Thomas Jefferson wrote the Declaration of Independence, but the entire Continental Congress edited the document.
The USA technically celebrates the ratification of the Declaration of Independence and not the signing. on July 4, 1776, the Continental Congress voted to ratify the Declaration of Independence. The date it was signed is disputed, but most historians believe it was signed on August 2, 1776.
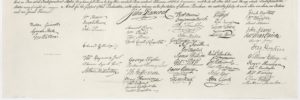
The names are not randomly oriented. John Hancock signature was in the middle as he was the president of the Continental Congress. The other 55 signatures are grouped by colony. The order of the colonies was based on geography. The most southern colony (Georgia) was first and the most north colony was last. The picture below is of the signers of the Declaration of Independence.
This image is from the Wikipedia “Signing of the United States Declaration of Independence” page.
This throw pillow pattern makes use of 2 pieces (one for the front and one for the back). Each piece consists of a blue granny square and a red and white panel. This project is good for beginners as it is very repetitive. It is also a great project for more seasoned crocheter looking for a quick project that they can make in an afternoon. The granny square gives the appearance of stars. There are 13 stripes in the panel, to represent the 13 original colonies. You can purchase a printable version of this pattern here or a kit to make this project at thecrafteaze.com/individual_projects.
Feel free to sell any finished throw pillow that you make from this pattern, but I would appreciate credit as the designer of the pattern. You CANNOT use my photos to sell your throw pillow. Also please do not sell my pattern as your own.
ch = chain
sc = single crochet
dc = double crochet
* * = work directions between stars the number of time specified.
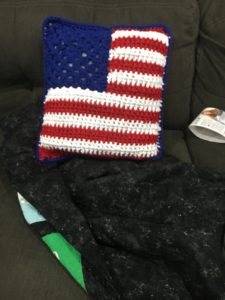
This is what the flag pillow I made looked like sitting on my couch.
Blue Granny Square (Make 2)
Round 1: Using the blue yarn, chain 3. 2 dc into the first chain (this makes 3 dc cluster). Chain 2 *3 dc, ch 2* 3 times. Slip stitch into the top chain of the first “chain 3” to close the round.
Round 2: Chain 3, 2 dc into the same corner as the ch 3. *3 dc, 2 ch, 3 dc* in the next 3 corners. 3 dc followed by 2 ch in the last corner. Slip stitch to the top of the first chain 3 to close the round.
Round 3: Chain 3, 2 dc into the same corner as the ch 3. *Make 3 dc in the space and then make 3 dc, 2 ch, 3dc * 3 times. Make 3 dc and 2 ch in the last corner. Slip stitch to the top of the first chain 3 to close the round.
Round 4: Chain 3, 2 dc into the same corner as the ch 3. *Make 3 dc in the next 2 spaces and then make 3 dc, 2 ch, 3dc * 3 times. Make 3 dc and ch 2 in the last corner. Slip stitch to the top of the first chain 3 to close the round.
Round 5: Chain 3, 2 dc into the same corner as the ch 3. *Make 3 dc in the next 3 spaces and then make 3 dc, 2 ch, 3dc * 3 times. Make 3 dc and 2 ch in the last corner. Slip stitch to the top of the first chain 3 to close the round. Bind off.
Flat Red and White Panel (Make 2)
With the red yarn, chain 34.
Row 1: Dc in the 3rd chain from your hook (this counts as the first dc). Dc in each chain, turn. (31 dc)
Row 2: Ch 2 (counts as the first dc). Dc in each st to last st, turn. (31 dc)
Row 3: Attach the white yarn. Ch 2 (counts as the first dc), dc in each st to last st, turn. (31 dc)
Rows 4-12: Ch 2 (counts as the first dc), dc in each st to last st, turn. Switch back between the red and white yarn every 2 rows. (31 dc)
Row 13: With the red, ch 2 (count as the first dc), dc in next 13 st, turn (14 dc).
Row 14-26 : Ch 2 (counts as the first dc), dc in each st to last st, turn (14 dc). Switch back between the red and white yarn every 2 rows. Bind off the ends.
Finishing
Join the blue square to the red and white panel, with right sides together with a needle and blue yarn. The panel should now look like a flag.
Join the two flag panels with the wrong sides together with the blue yarn. Join with a sc around 3 sides of the panels. Insert the pillow and finished joining with sc around the last side. With a slip stich join to the first sc. Bind off.