So I am really excited to announce CraftEaze’s newest line of products, the wedding decor DIY kits! I feel this product line will be very helpful for the bride that likes the idea of DIY decorations, but a) has no time to visit the craft store to buy supplies, b) unsure what colors or items would work well together, or c) brides who may have a slight craft addiction so by recommendation from their friends, family, and fiancee are supposed to avoid Joann or Michael’s at all costs!
These kits will before a variety of different wedding decor items. Some of the decor items may be table decorations, while others may be related to the ring bearer or flower girl. Each decor kit will come with a special suggestion for the bride. This suggestion may be a drink recipe, a movie to watch, or a sweet snack suggestion.
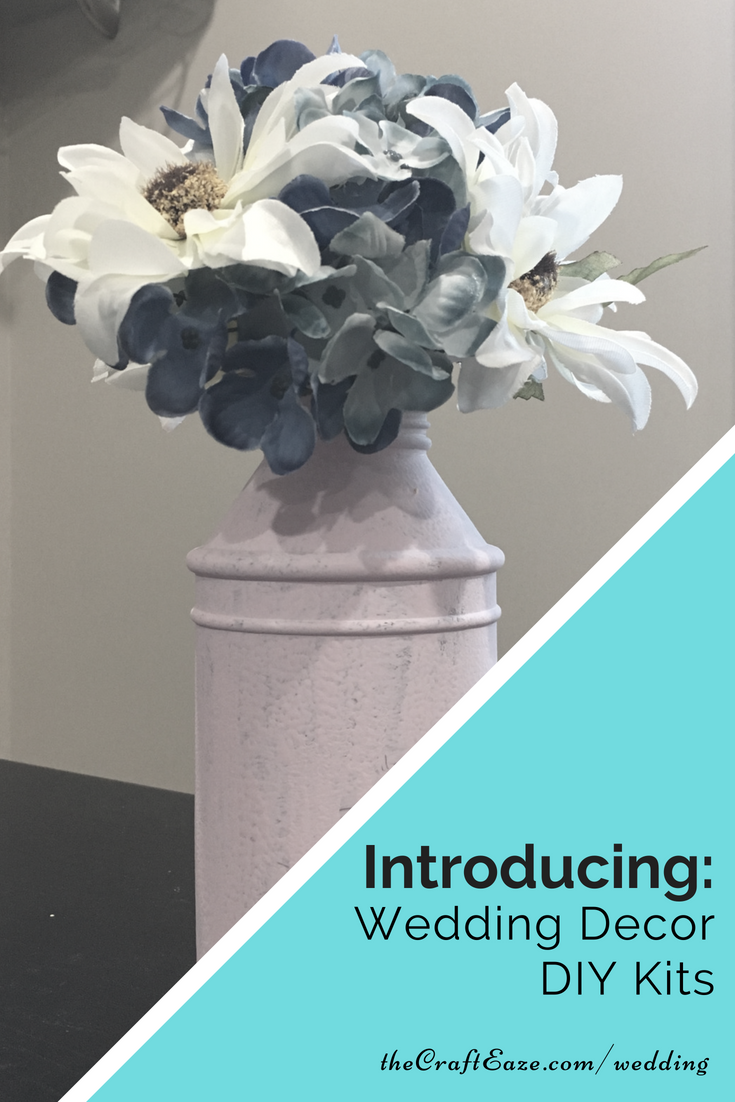
Our first product in this line is the Rustic Flower Vase. This flower vase is available in 5 different colors (baby blue, light grey, light pink, light purple, and teal). The paint is a matte finish which helps give the vase a nice rustic feel. This kit contains enough material to make 5 vases. These vases can be used for table decorations, table number displays, as decoration around the cake, or in the ceremony venue. This flower vase also comes a list of with possible flower combinations that can be used if the bride wants.
Be on the lookout for new and exciting wedding decor kits to come in the near future!
Disclosure: CraftEaze is a participant in the Amazon Services LLC Associates Program, an affiliate advertising program designed to provide a means for sites to earn advertising fees by advertising and linking to Amazon.com and affiliate sites.
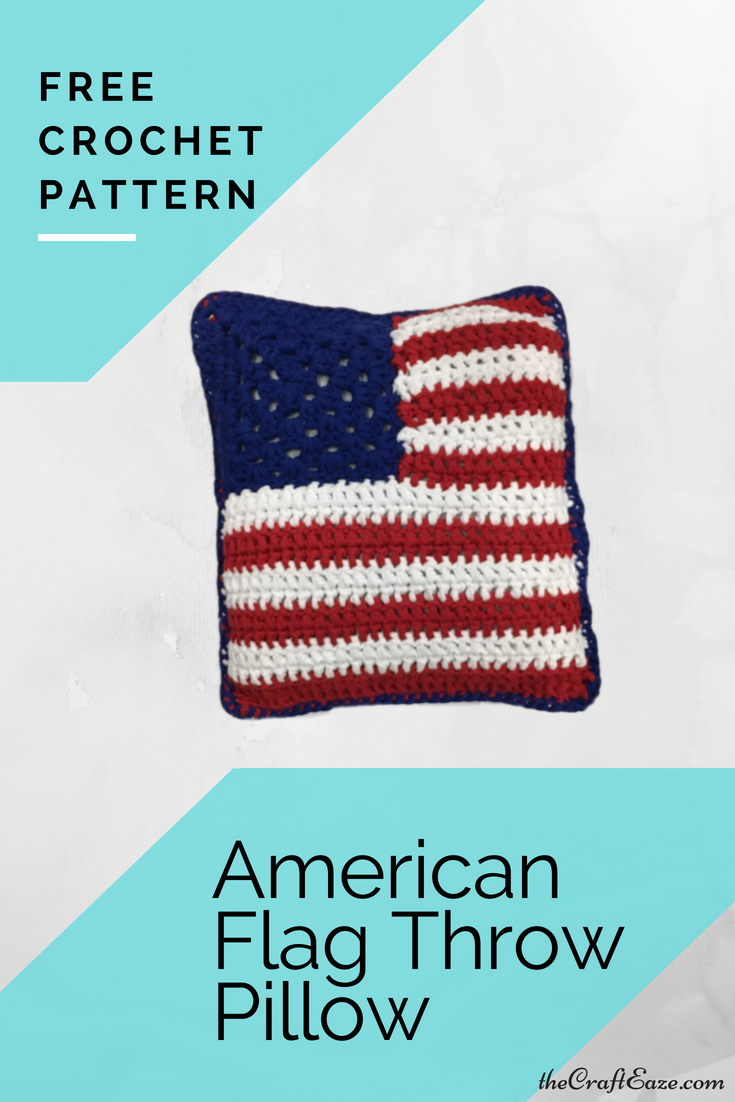
Summertime is official here and the 4th of July is just around the corner. I feel that its really easy to decorate your house/apartment for the 4th. Like if you put out a flag and a red/white/blue tablecloth, everyone compliments you on how festive your place looks. Sometimes, however, you want to put a little more effort into your decorating. This throw pillow is a perfect addition to your 4th of July decor collection.
Here are seven facts about the Declaration of Independence that you may not know.
56 people signed the Declaration of Independence.
Ben Franklin was the oldest signer of the Declaration of Independence (70 years old). Edward Rutledge was the youngest signer of the Declaration of Independence (26 years old).
8 signers were actually born in Britain.
During World War 2, the Declaration of Independence was housed in Fort Knox along with the Constitutions.
Thomas Jefferson wrote the Declaration of Independence, but the entire Continental Congress edited the document.
The USA technically celebrates the ratification of the Declaration of Independence and not the signing. on July 4, 1776, the Continental Congress voted to ratify the Declaration of Independence. The date it was signed is disputed, but most historians believe it was signed on August 2, 1776.
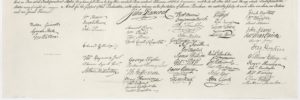
The names are not randomly oriented. John Hancock signature was in the middle as he was the president of the Continental Congress. The other 55 signatures are grouped by colony. The order of the colonies was based on geography. The most southern colony (Georgia) was first and the most north colony was last. The picture below is of the signers of the Declaration of Independence.
This image is from the Wikipedia “Signing of the United States Declaration of Independence” page.
This throw pillow pattern makes use of 2 pieces (one for the front and one for the back). Each piece consists of a blue granny square and a red and white panel. This project is good for beginners as it is very repetitive. It is also a great project for more seasoned crocheter looking for a quick project that they can make in an afternoon. The granny square gives the appearance of stars. There are 13 stripes in the panel, to represent the 13 original colonies. You can purchase a printable version of this pattern here or a kit to make this project at thecrafteaze.com/individual_projects.
Feel free to sell any finished throw pillow that you make from this pattern, but I would appreciate credit as the designer of the pattern. You CANNOT use my photos to sell your throw pillow. Also please do not sell my pattern as your own.
ch = chain
sc = single crochet
dc = double crochet
* * = work directions between stars the number of time specified.
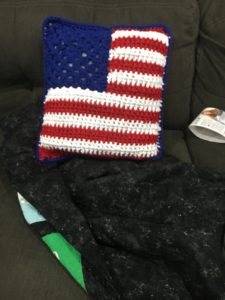
This is what the flag pillow I made looked like sitting on my couch.
Blue Granny Square (Make 2)
Round 1: Using the blue yarn, chain 3. 2 dc into the first chain (this makes 3 dc cluster). Chain 2 *3 dc, ch 2* 3 times. Slip stitch into the top chain of the first “chain 3” to close the round.
Round 2: Chain 3, 2 dc into the same corner as the ch 3. *3 dc, 2 ch, 3 dc* in the next 3 corners. 3 dc followed by 2 ch in the last corner. Slip stitch to the top of the first chain 3 to close the round.
Round 3: Chain 3, 2 dc into the same corner as the ch 3. *Make 3 dc in the space and then make 3 dc, 2 ch, 3dc * 3 times. Make 3 dc and 2 ch in the last corner. Slip stitch to the top of the first chain 3 to close the round.
Round 4: Chain 3, 2 dc into the same corner as the ch 3. *Make 3 dc in the next 2 spaces and then make 3 dc, 2 ch, 3dc * 3 times. Make 3 dc and ch 2 in the last corner. Slip stitch to the top of the first chain 3 to close the round.
Round 5: Chain 3, 2 dc into the same corner as the ch 3. *Make 3 dc in the next 3 spaces and then make 3 dc, 2 ch, 3dc * 3 times. Make 3 dc and 2 ch in the last corner. Slip stitch to the top of the first chain 3 to close the round. Bind off.
Flat Red and White Panel (Make 2)
With the red yarn, chain 34.
Row 1: Dc in the 3rd chain from your hook (this counts as the first dc). Dc in each chain, turn. (31 dc)
Row 2: Ch 2 (counts as the first dc). Dc in each st to last st, turn. (31 dc)
Row 3: Attach the white yarn. Ch 2 (counts as the first dc), dc in each st to last st, turn. (31 dc)
Rows 4-12: Ch 2 (counts as the first dc), dc in each st to last st, turn. Switch back between the red and white yarn every 2 rows. (31 dc)
Row 13: With the red, ch 2 (count as the first dc), dc in next 13 st, turn (14 dc).
Row 14-26 : Ch 2 (counts as the first dc), dc in each st to last st, turn (14 dc). Switch back between the red and white yarn every 2 rows. Bind off the ends.
Finishing
Join the blue square to the red and white panel, with right sides together with a needle and blue yarn. The panel should now look like a flag.
Join the two flag panels with the wrong sides together with the blue yarn. Join with a sc around 3 sides of the panels. Insert the pillow and finished joining with sc around the last side. With a slip stich join to the first sc. Bind off.
Hi! I unveiled the June crochet box today on Facebook live. Just in case you missed the video, you can check it out below. The June crochet project is an American flag throw pillow. This pillow can be used to decorate your living room for the 4th of July. The video will show you all the supplies in the box. If you think this box looks like a fun project, you can now buy this box as an individual project at thecrafteaze.com/individual_projects.
Disclosure: CraftEaze is a participant in the Amazon Services LLC Associates Program, an affiliate advertising program designed to provide a means for sites to earn advertising fees by advertising and linking to Amazon.com and affiliate sites.
I will be the first person to admit that I’m clumsy. I’m constantly finding new ways to break things or to hurt myself (I will find any hole in a parking lot to twist my ankle in). Just to show the magnitude of my clumsiness, here are a few examples. My first month of college, I broke my LG Shine cell phone (remember those phones that screen was supposed to be like a mirror but never really worked as a mirror) by walking into a table. This wasn’t just an excuse I gave my parents for needing a new phone, I literally walked into the corner of a table with the phone in my pocket and broke the screen. Then a few years back I hurt my foot getting out of bed one morning. I didn’t turn my bedside light on and walked straight into the corner post of my bed. Trust me when I say its pretty embarrassing to have to admit you hurt yourself getting out of bed when you are asked why you are limping.
So the reason that I told these two short stories is to give a little background information about why the chevron laptop sleeve was the inaugural CraftEaze crochet subscription box project. I made a few laptop sleeves in the past for my Etsy store and they sold fairly well. So when I mentioned the idea of CraftEaze to my boyfriend, he said the laptop sleeve would be the perfect first project! He thought the laptop sleeve looked cool and could be useful. If a person as clumsy as me can protect my laptop with a sleeve, then it should work for just about anyone.
This laptop sleeve pattern contains instructions for both a 14″ and 17″ laptop. It is also a suitable project for beginners as it is very repetitive. It is also a great project for more seasoned crocheter looking for a quick project that they can make in an afternoon. The laptop sleeve is soft and will protect your laptop from scratches. You can purchase a printable version of this pattern at thecrafteaze.com/patterns or a kit to make this project at thecrafteaze.com/individual_projects.
Feel free to sell any finished laptop sleeve that you make from this pattern, but I would appreciate credit as the designer of the pattern. You CANNOT use my photos to sell your laptop sleeve. Also please do not sell my pattern as your own.
~350 yards of Medium (4) Acrylic Yarn (I used 2 skeins of Premier Yarn Sweet Roll Yarn for this project because it naturally makes wide colorful strips)
4 5/8″ or 1″ buttons
Abbreviations
ch = chain
sc = single crochet
dc = double crochet
V-St = V Stich (1 dc, 1 ch, 1 dc all in same chain or space)
* * = work directions between stars the number of time specified.
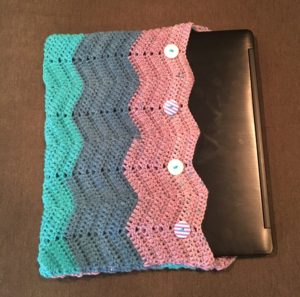
My 17″ laptop in the chevron laptop sleeve I made myself.
For 17” Laptop:
Ch 71. Row 1 (Right side): Work 2 dc in the 2nd chain from hook, *dc in next 7 ch, skip 2 ch, dc in next 7 ch, V-st in next ch* 3 times, dc in next 7 ch, skip 2 ch, dc in next 7 ch, 2 dc in the last ch, turn. Row 2: Ch 1, 2 dc in the first dc, *dc in next 7 dc, skip next 2 dc, dc in next 7 dc, V-st in ch 1 space* 3 times, dc in next 7 dc, skip next 2 dc, dc in next 7 dc, 2 dc in the last dc, turn. Rows 3-44: Repeat row 2.
Continue in the Finishing instructions.
For 14” laptop:
Ch 54. Row 1 (Right Side): Work 2 dc in the 2nd chain from hook, *dc in next 7 ch, skip 2 ch, dc in next 7 ch, V-st in next ch* 2 times, dc in next 7 ch, skip 2 ch, dc in next 7 ch, 2 dc in the last ch, turn. Row 2: Ch 1, 2 dc in the first dc, *dc in next 7 dc, skip next 2 dc, dc in next 7 dc, V-st in ch 1 space * 2 times, dc in next 7 dc, skip next 2 dc, dc in next 7 dc, 2 dc in the last dc, turn. Rows 3-40: Repeat row 2.
Continue in the Finishing instructions.
Finishing (for both sizes):
You should fold laptop cover like so. This will create a 2-row ledge that can be folded over and fastened with the buttons.
With right sides held together, sc the 3rd row and the last row together. Sc the two sides together. Fasten off. Attach yarn to the other side on the last row, sc the 3rd and last row together. Sc the two sides together. Fasten off. Weave in all ends. Turn the sleeve right side out. Add the buttons to the valleys on the shorter side between the top row and the 2nd row from the top. The 17” laptop sleeve will require 4 buttons and the 14” laptop sleeve will require 3 buttons. The space at the top of the corresponding peaks are the buttonholes.
Disclosure: CraftEaze is a participant in the Amazon Services LLC Associates Program, an affiliate advertising program designed to provide a means for sites to earn advertising fees by advertising and linking to Amazon.com and affiliate sites.
Learning to crochet can be fun. I first learned how to crochet on a summer internship between my sophomore and junior year in college. A colleague who attended the same college taught me during that summer, and I was immediately hooked! In this blog post, I will talk about the 5 things that I feel you need when you are learning how to crochet.
1) Patience
Remember Rome wasn’t built in a day, so don’t expect to be the best crocheter ever the first day. It will take a lot of practice and patience at first, but if you work hard and stick with it you will soon start to make some awesome projects.
2) Youtube
Youtube is a great resource when you are learning how to crochet or to learn how to make a new stitch. There are several great videos out there teaching the basics like how to make a chain, single crochet, or double crochet along with some more advance items like how to work corner to corner. I have recently been working on an outer space blanket corner to corner blanket. The pattern I am using for this blanket is from Whistle and Ivy (https://www.whistleandivy.com/, you should definitely check out this site because she has some really cute ideas. Since this is my first major corner to corner project, I have been utilizing Youtube a lot for refreshers.
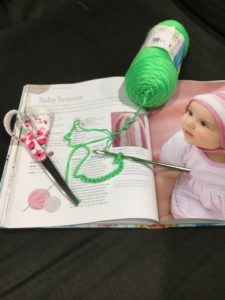
This is a photo of my personal scissors. I love my flower scissors!
3) A Unique Pair of Scissors
You are going to want a good pair of scissors that is only used for your yarn. I personally like to use colorful items. The bright colorful items just have a way of brightening your mood. I currently have a pair of Fiskars floral scissors. Fiskars has floral scissors in pink and blue that you can buy on Amazon or at Joann Fabrics or Michaels. The scissors I own has large pink flowers on them, which makes it easy to use only for my yarn projects. And because of the large pink flowers, my boyfriend knows not to use these scissors to cut paper or tape.
4) A Pinterest Account
I know what you’re think, ” Jamie, where have you been the last couple of year, everyone has a Pinterest account today because where else will you find Joanna Gaines inspired decor projects or your DIY rustic wedding decor”. But it is also a great resource when you are learning how to crochet. There are tons of patterns available on Pinterest. Some of these patterns are for more experienced crafters, but a lot are simple projects for beginners. Its user interface also makes it super easy to search for particular projects. Like if you want to find a baby blanket, you can search for “Easy Crochet Baby Blanket Patterns”. You can also find crochet blogs that can teach you how to make different types of stitches.
5) A Sense of Adventure
Once you start to crochet, you will be embarking a lifelong crafting journey. You will be looking for new patterns to try, new stitches, and new types of yarns. There are several times when I’m wondering around Joann Fabrics, Michaels, or Pat Catans where I will see a new or different type of yarn and will want to buy it just to see what I can make out of it. That’s the great thing about crocheting, you can always try new things. Here at CraftEaze we love this adventure so much that we created a monthly subscription service that will deliver a new project (with all of the supplies) directly to your door! These projects are good for beginners and also will introduce you to different types of yarn and patterns. Check out the subscriptions menu for more information.
Hi! A few weeks ago we had a Facebook live video going over what could be found in the May crochet CraftEaze box. Going forward the May box will be a welcome box for all new subscribers! In case you missed the Facebook live video, you can check it out below. Thanks for watching!